| Warning: This page it's very incomplete, use this article, particular has very caution! Please help finish it this page! |

BEANS[]
- Preparation Work
- Seedlist
- Seed Preparation
- Field Design
- Sample Planting Plan Page
- Laying out and Filling Planting Trays
- Measuring and Marking Ranges
- Planting
- Staking
- Notebook
- Sample Notebook Page
- Pollinations
- Harvest
- Threshing
- Inventory
- Creating Pedigrees
Preparation Work[]
- In the Northern Hemisphere this was around January - March
- There may be a number of other tasks running concurrently from January to March but the main work is the selection of material to grow in the spring and preparation of seed for planting.
Seedlist[]
Selection Work[]
Selection Work - General
- The basic task at this time of year is to work from the Inventories to select the material that is to be prepared for planting and to print out the Seedlists. Often the Bean Nursery has been prepared first, followed by the Isolated Maize Crossing Blocks and GENERIC SEEDS Maize Yield Trials because these can be large and involve more seed counting and other work. Even though the Cereals are planted first, they are usually prepared last because often there are not many changes to be made between the Cereals Inventories and Cereals Seedlists. All of the seedlists are open for additions and changes right up until a week or so after planting.
- If a single database is being used to store the data for all seed in the storage room, there should be some indication in each database record regarding the Nursery the seed came from and the year that the seed was harvested. This is because much of what is planted the next season in a specific nursery is drawn from the previous year's inventory of that same nursery. It is rare to include material from 2 or more years previously or from another nursery.
- The Seedlists are printed as 8.5 in. x 11 in. portrait size.
Selection work - Bean Nursery
- For the selection work, one can work from either of two ways of listing the inventory so long as one understands the relationship between the two ways of listing. One method of showing the inventory shows the number of plants harvested from each row in the bean nursery. This will be referred to as the Notebook format of the Inventory because the data was recorded in the notebook and the breeder can work with this if desired (See Appendix A). The Notebook format Inventory is either in the form of the Notebook pages or several columns have been deleted and it has been saved as a separate Notebook Inventory database or spreadsheet file. The other type of inventory is a listing of the actual seed of plants harvested and the labeled pedigrees of the seed in each seed packet. This will be referred to as the Label format Inventory (See Appendix B). Since it is the seed that is being kept, use of the word Inventory will refer to the Label format Inventory.
- The list of seed pedigrees (Label Format Inventory) is the best to work with in terms of making the seedlist but the breeder may find the other type of inventory (Notebook Format) simpler for seeing the big picture.
- The breeder doing the selecting can work from a printed copy of the Bean Nursery Inventory (either format) or from a computer version if things are properly set up.
- If the breeder is working with the Label Format Inventory for the Bean Nursery, he will basically be able to tell from the pedigrees and source row numbers how many plants were collected from a particular row. The breeder can then place an x to the extreme left or right of a record to indicate it is not to be included in the seedlist. Material that is to be added can be written in pen at the end of the printed copy of the Inventory that he is working with. This is the basic method that can be resorted to if other methods are not available.
- The selection work for the Bean Observation rows and Bean Yield Trials is usually done very close to planting time from an Inventory of the bulk seed. The weights of seed available will be needed to determine the number of rows to grow and how long the rows will be.

Creation of the Seedlist - Bean Nursery[]
- The computer operator uses the marked inventory to create the Bean Nursery Seedlist (See Appendix C). A copy of the Bean Nursery Inventory (Label Format) is renamed as the Seedlist and all the marked records deleted and new seed added to the list as indicated on the breeder's marked copy of the Inventory. This involves close attention to detail and constant double checking to ensure nothing was missed in transferring the information from the marked inventory to the new seedlist. An automated version based on computer generated selections would be best. i.e. The breeder makes the selections on a screen copy of the Inventory and the computer formats the results into the Seedlist ready for printing.
- The format of the Seedlist differs from the Inventory regarding the order of columns and this formatting will have to be done before printing the Seedlist. The basic fomat for a Bean Nursery Seedlist by columns is: Plot#, Family, Pedigree, Source Row and Source row of previous years. There may also be a column for remarks on the seed placed after the Source row column. If possible, print only the most recent source row column to avoid possible mistakes from reading the wrong column. If a column has to be moved, be very careful not to move it up or down but only straight across. The Seedlist should use a font of 12 point or higher and possibly be printed in bold with a distinct space between records. A perforated line i.e. ............ between records might also help. The height of the space in which the writing appears should also be a good size. This will help in reading the Seedlist and reading properly across the page.
- The Bean Nursery Seedlist is created in terms of Plot#'s.While remembering that a plot is 2 rows, the pedigee is shown only for the plot#, not for each row. Reserve Plot#'s 1-1500 for the Bean Nursery. Note that there will be no confusion if the row numbers of the Maize Inbreeding Nursery are the same since beans don't look like corn. If the Bean Nursery Seedlist was prepared in terms of rows it would be twice as long and require duplicating the pedigree information for the second row of each two-row plot. By using plot#'s rather than row#'s, the plot#'s can easily be listed consecutively down the proper column on the left using Excel's datafill command or something similar. Put in the Plot #'s just before printing. There may be quite a bit of rearranging before then.
- One of the things to add to the seedlist before adding the plot numbers is check varieties. This will be one or more commercially available varieties with a desirable trait, such as earliness,disease resistance or high yield , that you want to compare your material with. There should be at least one plot of this variety in each range for each trait and bean type. It might be decided to put a check variety in every 25th or even 10th plot. Some of the checks used for white beans have been Mitchells, Envoys and Seafarers. Usually, they were put in every 25th plot using a macro on the seedlist that went down 24 rows, inserted a row, put in the pedigree as the check variety and then repeated itself.
- It may be necessary from time to time to use some function in Excel or Access that counts the number of records in the Seedlist to determine the size of the Nursery. Usually the size is not to exceed 1200 plots. Note that something like 50 plots need to be reserved at the back of the Nursery for new material to be received before and after planting as well as for recently crossed material that will be planted by hand due to the limited amount of seed. These plot#'s don't need to be printed on the seedlist until later. Just keep them in mind when the actual size of the Nursery is figured out.
- It may be desirable to move some records around and do some sorting to get similar material together. Be very aware of any possible problems that can occur with sorting. Sorting records in a database should be best. Sorting can be done on Excel's spreadsheet but if the data is not all highlighted and there are any blank columns between the data, one part will be sorted and the other part will not be sorted.
- Once you have a list of the material to be grown including the check varieties, you can add the plot numbers at the extreme left using Excel’s datafill command. If you don’t have Excel you can use various copied formulas in cells or type each plot number in by hand.
- The seedlist can be printed out and work started on preparing the seed for planting.

Seed preparation - Bean Nursery[]
Seed preparation is done according to the Seedlist. The person preparing seed should have or create a set of seed envelopes with duplicates of each plot#. This means there are 2 envelopes marked with the same plot# for all plot#'s. A stamper that can be set to change numbers after two printings and ink may be needed. The envelopes are #2 coin envelopes that fit into the small white trays. Once the envelopes are numbered, one will need a foot long ruler, a large tray of 10 empty small white trays, and the first large box from the storage room that contains the seed harvested from the Bean Nursery in the previous year. Don't remove just the envelope of seed needed but take the entire large tray of storage envelopes to the work bench. A small balance will also be needed to help count seeds. If a balance is not available the counting can be done by hand. The person preparing the seed will first place the ruler on the seedlist beneath the first record which also corresponds to the first plot#. The ruler is to help with moving the eyes straight across a record horizontally. One could also use a blank piece of paper positioned sideways (landscape) below each line. Two envelopes with this same first plot# are taken from the pile of empty envelopes. Make very sure there are no seeds in the envelope from the previous year . Look at the source row number on the Seedlist of the seed needed and find the storage envelopes with that source number in the storage trays. Look at the pedigree required and select the same pedigree from the storage envelopes of the same source row #. The pedigree on the storage envelope should match the pedigree on the seedlist.
The breeder might change the number of seeds to be planted per row, but usually, 50 seeds per envelope has been used. (This is actually very thick for beans and may need to be lower but the cones plant in bunches anyway because more than one bean will fall into a slot). Count out by hand or use the balance to count out 100 seeds from the storage envelope and put 50 seeds in each new envelope. By hand it would be easier to count out 50 two times. Use any way that works best for you. Place the newly filled envelopes at the front of the first small white tray with a bottle behind them to keep them erect. Put the storage envelope back in its proper place in the storage tray. As much as possible, develop a routine habit of working that avoids confusion and keeps the work moving along smoothly. Always complete the task at hand and start fresh before beginning the next task. E.g. Put back the storage envelope used before getting a new storage envelope or put the storage envelope away and the newly filled envelopes in the white tray before starting with the next plot#.
DROPPED SEED
- Be very careful not to drop seed. Seed that falls to the floor must stay there and be put into the garbage when the area is swept. This is to ensure that only correct seed is placed in envelopes for planting.
INSUFFICIENT SEED
- Sometimes it happens that there is not enough seed available for the number of plots planned according to the seedlist. If this happens, the person preparing the seed should notify the breeder. The breeder may simply abandon planting that seed in the plot and replace it with some check variety or other filler just so plot#'s don't have to be changed. The breeder may also choose to grow only one row of the plot and put some type of filler in the other row of the plot such as BRC syn (CanaMaize) corn to be hoed out later or some check bean variety. Changes made to the seedlist should be indicated legibly in pen and updated to the computer after the Seedlist preparation is finished.
- Some of the bean varieties such as the Lima beans are very large and cannot be put through the planter. The envelopes for these varieties should still be filled and put in the small white trays. When preparing the planter trays, these oversize seed envelopes will have to be set aside for hand planting and empty duplicate numbered sets of envelopes used to keep the place of these plots.
Counting[]
Manual Counting[]
- You need 2 corners cut from the top of a cardboard shoe box. They should have two sides that meet at a corner. Pour an amount of seed from the appropriate storage envelope into one corner piece. Slide the other corner piece under the first so the back edge is twice as long as for one piece and the open side is closest to you. Use a pointer of some kind, like a sharp pencil, to separate 2 or three seeds from the others. Move these seeds using the pencil in a horizontal sweeping motion to the other corner,counting by 2's or threes. Continue transferring seed from the one side to the other until you have 50 seeds in the other corner. Use the sides of the corner piece to help pour the 50 seeds into one of the empty envelopes. Repeat for the second envelope and then put any remnant seed back in the storage envelope. Put the storage envelope away and then put the newly filled envelopes in the small white trays.
Using a Balance to Count[]
- The balance is for weights of less than 1 kg and will have a unit counting feature. See the instructions for use of the balance regarding how to proceed. Use a small pan rather than a large one. Remember to always tare out the pan's weight so you can work just with the weight of seed or unit count.
- First, prepare the balance to take an average seed weight. This can be based on 5,10 or 20 seeds depending on the accuracy desired. Use the 10 or 20 seed average. If using the 10 seed average, count out 10 seeds into the pan and begin according to the instructions for use of the balance as a unit counter. The unit count should say 10 and adding one or two more should increase it by one or two units. Add more seed until you have 50 units, pour the 50 units into one of the empty envelopes. Pour 50 more units from the storage envelope into the pan and then pour these 50 units into the second empty envelope. Put the 2 newly filled envelopes into the small white tray and return the storage envelope to its proper place in the storage tray.
- Since seed of different varieties will have different sizes and weights, the unit count procedure will have to be done for each new variety of seed. This means everytime the pedigree changes.
- There are also electronic seed counters that can be bought with multiple spouts for filling more than one envelope at a time.
Rough and Ready Count[]
- For certain nurseries, such as the Maize Inbreeding Nursery that will be overplanted and thinned at a later date, it is acceptable to measure out seed quantities by sight only. The point is that this can be done where the number of plants in a row or plot is not important. Only about 10 good plants are wanted in each row of the Maize Inbreeding Nursery but 15-20 seeds are planted. 20 seeds can be placed in the palm to get an idea of the amount and then a similar amount is poured into the palm of one hand each time seed is needed. The seed is then poured from the palm into the envelope with the correct row #.
Designing the Bean Fields[]
Measuring the Field
- Once it has been decided where the Bean Nursery, Bean Observation Rows and Bean Yield Trials will be grown, that part of the field will have to be measured and marked out. The Bean Observation Rows and Bean Yield Trials don’t necessarily have to be beside the Bean Nursery or even in the same field but that has been the usual layout. The field measuring can be done as soon as the weather and soil conditions permit (mid to late May ). A rough measure can be taken many weeks before planting. A more accurate measurement will then be made just prior to planting as a check and to set up field markers and guides for driving a straight line.
- A few weeks before planting, two people need to go to the field with a 50 ft - 100 ft measuring tape and measure the available width and length of the part of the field that will contain the Bean Nursery, Bean Observation Rows and Bean Yield Trials. By this time in the spring, the number of rows needed for the Bean Nursery, Bean Observation rows, short row Bean Yield trials and long row Bean Yield trials will be known and on seedlists. One might want to take a calculator and the figures for the numbers of plots of prepared seed in the bean nursery and number of entries for the observation rows and yield trials. This will allow one to make some calculations in the field and consider how many rows wide to make the nursery and how much space will be needed.
- It is easiest if the Bean Nursery is planted starting from the left or right side of the field, followed by a small pathway and then the Observation Rows, small row Yield Trials and Long row Yield Trials. If there are solid seeded Yield Trials they can be added to the open side.
- In this discussion, I’m going to try to use the word length to refer to the longest linear measure and width to refer to the shorter linear measure but it gets confusing sometimes. I tend to think of the width of a Nursery field as the distance from left to right as I stand in front of it but it’s possible that this could be the shorter distance if a Nursery was two plots wide and a mile long. I’m also going to use feet rather than metres just because that was used at the time, partly due to fields being measured in terms of miles.
- Let’s say the field is shaped like a landscape 11 in. x 8.5 in. piece of paper. The plant rows of the headlands will run parallel to the long side. The plant rows of the Bean Nursery will run perpendicular to the long side. The ranges will have a width equal to the plot length and a length equal to the number of plots wide. As you can see, this is a bit confusing since the range width is the plot length and the range length is equal to my personal idea of the Nursery width.
- The Bean Nursery will have an outline shape of a square or a rectangle. Inside this outline shape are many smaller rectangles shaped like rulers placed horizontally on a page and spaced vertically a few centimeters apart down the page like the lines on a lined piece of paper. These smaller rectangles are the ranges. If the smallest markings were drawn across the full width of each ruler, they would be the rows of the Bean Nursery and the spaces between the rulers, would be the pathways.
- Begin measuring the field by marking with a heel a short line in the soil about 1 ft. from the sodded edge of the field parallel to the long side. This mark is where you figure the first headland row will be. Then have the second person take the end of the tape and move perpendicular to the long side until they reach the end of the tape. Just before they reach the end of the tape, shout out the measurement to let the other person know when to slow down and stop and to tell the other person the cumulative measurement in case you lose count Tighten the tape and have the person make a mark with their heel in the soil at the end of the tape. Have the other person continue to move down the field for the full length of the tape. Move to the next mark and just before reaching it, shout out the cumulative measurement. Try to stay perpendicular to the long side, perhaps by sighting on a distant tree or other object in the distance. Continue this marking until you reach the other side of the field and have a final measurement. Let’s say we measure a total of 390 ft from end to end. Record the total distance measured. A measurement can also be taken parallel to the long side of this landscape shaped field to give one something to work with in that direction. It may not be necessary to measure the entire distance but having that figure would be useful. Record this second measurement.
- The calculations that follow could be done in the field or back in the office.
BEAN NURSERY (Design and Sizing)[]
You will need to know how wide the headlands on each end of the field will be. A planter pass is 10 ft.. wide (Find the correct width depending on the equipment used). Usually there are two headlands, one on each end of the field. The headlands are of two or three planter passes in width (8 - 12 rows, 20 –30 ft.). Usually the front headland has been 12 rows and the back headland has varied according to available space. For these notes, there will be 30 inch rows and a 12 row headland at each end of the field.
You will need to set a range width. Usually for the Beans this has been of about 15 feet including the path (12 feet of plot + 3 feet of path (or 2 x 1.5 ft of path at each end of the plot)). The range width for the Bean Nursery was short and maybe about 13 ft. - 15 ft.. Later, you may want to adjust the range width up or down to match available space. You want to know how many ranges will fit in the field. For the landscape paper shaped field,use the measurement of the short side of the field (390 ft.). This will be the direction in which the Nursery rows will run. In other cases, which side to measure will depend on the direction the Bean Nursery rows will be grown in, depending on where the field is accessed. Subtract 60' for 12 rows of headland at each end of the field. The amount of headland to grow may vary with circumstances.
E.g. Available distance = 390 ft. - 60 ft (2 x 30 ft. per headland) = 330 ft.
If the space available for ranges is 330 ft. and the range width is 15 ft., there will be 22 ranges and no extra space to play with (330 ft. / 15 ft. range width = 22.0 ranges). The processes of marking and planting the plots isn’t accurate so you could have a last range that is a little bit shorter than 15 ft.. If the range width chosen was 18 ft., there would be 18 ranges (330 ft. / 18 ft. per range = 18.33333 = 18 ranges (drop anything after the decimal)) and a gap of about 6 ft (18 ft. x .3333 ranges) at the back of the nursery which isn’t too bad. You want to avoid gaps that are larger than that.
In sizing the field it is better to be a bit generous than too stingy. You want to have as few empty plots as possible but make some allowance for possible late arriving new seed and for growing material crossed during the winter. For example, given 250 seedlist plots and 12 ranges, a nursery could be set at 21 plots wide (250 plots / 12 ranges = 20.8333 = 21 plots per range (if there is anything after the decimal, add 1 and drop what is after the decimal). 21 plots per range x 12 ranges = 252 plots. This leaves only 2 empty plots which is too stingy since you want something like 10 - 15 plots (20 - 30 rows) for planting newly received late addition seed, material that was crossed in the winter months and plants to be crossed in the field.
22 plots wide would give 14 empty plots which gives some breathing room (22 plots per range x 12 ranges = 264 plots).
To find the space this requires in the direction parallel to the headland, one can multiply the number of plots by 2 times the row width, or multiply the number of rows (2 x number of plots) by the row width and add 1 ft. for a space between the edge of the field on one side and the width of at least 4 rows on that same side. The four rows will act as guard rows and also protect the outer Nursery plots from competing with plants on the edge of the field (4 rows x 30 in. = 10 ft.). Four to eight guard rows might be planted on a side if it is bordered by sod. This keeps the first plots on the sod side away from weeds that might move into the field from the sodded area. Since Beans are self-pollinating, one isn’t really worried about cross pollination but Bees and other insects can surprise people.. Also, add a few feet for a path between the Nursery and the Observation/Seed Increase rows (3 ft. ?). Remember that if you work with rows, the number of Nursery rows wide must be an even number. If it isn’t, plots on the sides will have a row in the next range. Knowing the number of rows wide can be useful to calculate the number of rounds the planter will make and how many rows will be planted on the last pass. For a 4 row planter planting 2 row plots this is no big deal but what about a half round planting only 2 rows with a 24 planter? This comes up a bit in the Maize Inbreeding Nursery which is planted as single rows. Is it worth it to plant a half round of only a single row?
Example: 22 plots wide x 5 ft. plot width + 1 ft. edge space + 10 ft. side border rows + 3 ft. pathway down the field = 124 ft.
- OR
22 plots wide x 2 rows/ plot x 2.5 ft. row width + 1 ft. edge space + 10 ft. border rows + 3 ft. pathway down the field = 124 ft.
Note also that you may prefer to work with just the number of seedlist plots and adjust the number of plots in a range to increase the number of extra rows. Play with it and find a way that works best for you.
Once the number of ranges and number of plots per range has been set, one can create the Bean Nursery Planting Plan showing the ranges of plots and the direction of plots in each range of a serpentine design.


Once the Planting Plan is printed out, one can lay out the empty planting trays whether large brown cardboard trays (with exactly ten white trays in each) or the plastic 4 cell Kinze trays.
OBSERVATION ROWS[]
Next you need to know how many varieties will be planted as Observation/Seed Increase rows and how long those rows will be. Usually, these were short single rows possibly split into two ranges with a pathway between ranges. The required width in number of rows will be either (the number of varieties / the number of ranges) OR (the number of varieties / the number of ranges) +1) depending on what you decide to do if there are an odd number of varieties. The width in feet will be the number of rows wide x the row width in feet.
- Example: Field width 390 ft - 60 ft. for 2 headlands = 330 ft.
- 11 varieties changed to 12 varieties for 3 ranges of 107 ft. with 3 ft. pathways = 107 ft. per variety * 3 ranges + 9 ft. for pathways = 330 ft.
12 varieties/3 ranges = 4 rows wide. 4 rows wide * 2.5 ft. row width = 10 ft. This could be planted in one 4 row planter pass but at each path, planting must stop, the planter boxes must be emptied and spun out and 4 new varieties added to the planter boxes. One might also toy with 100 ft. rows and 10 foot pathways.The path could be seeded to a cereal crop to protect the soil from wind erosion if that was a concern.
Yield Trials[]
For the Bean Yield Trials, the number of rows for each variety was usually 4 rows depending on the amount of seed available for each variety. There also may be shorter row lengths and multiple ranges for varieties with a small amount of seed. Sort the varieties by amount of seed available and set a cutoff amount necessary to be included in the Yield Trial Seedlist. Group the varieties from smallest amount to highest and determine the amounts of seed needed for short rows in 2 or more ranges and for long rows down the full length of the field or to the maximum length. Plan to plant the short rows and then the long rows. Determine the number of rows wide that will be used and multiply by the row width to get a total width measurement.
Laying out the planting trays[]
Explaining about laying out the planting trays would best be done with a video or at least with the use of pictures. Two different types of trays have been used:
- 1. Plastic Trays
- These trays are used in the automatic indexer on the Kinze Planter. They are clear plastic with 4 bubbles/pockets/cells wide and eighteen long. There are some pros and cons of the automatic indexer to consider which will be discussed later in a planting section. The seed in the seed envelopes is poured into the cells.
- 2. Cardboard Trays
- These are large brown cardboard trays with 10 small white cardboard trays inside. The seed envelopes are placed in the white cardboard trays in the large brown cardboard trays.
A large table is needed to layout the trays on. Two tables can be put together or even plywood sheeting can be used if it's strong enough to hold the weight. The longer the surface available, the better, but a method will be shown regarding how to work with wide fields.
A Planting Plan is essential to laying out the trays. First determine the number of trays needed depending on the number of rows wide the trial is to be. For a 60 row wide field, at least 15 plastic trays would be needed or 6 large brown cardboard boxes.
The plastic trays are placed 4 cells wide side by side. 15 such trays beside each other will give 60 rows wide. That is 30 2-row plots wide. The plastic trays hold eighteen ranges. How to add more ranges will be covered later. The brown cardboard trays will hold more ranges but it depends on how fat the seed envelopes are.
If the table is too short to hold 15 trays, layout the trays as far as possible on one side of the table and then continue around the table laying out trays going in the other direction on the other side. This can be thought of as folding one long line of trays. Whether the fold occurs on the left side or right depends on which side of the field Plot # 1 is on. Make every possible effort to prevent movement around the table on the end opposite the fold. A physical barrier is better than a mental one.
- Example: The Planting Plan is placed before you in the middle of the table. It calls for 60 rows (30 plots) wide by 10 ranges long. Plot#1 is on the bottom left (The first range moves from left to right). The table holds only 10 plastic trays wide. 15 trays are needed.
The plastic planting trays need to be labeled numerically to specify the end that corresponds to the first range and the order in which they are to be planted. Masking tape and a black marker can be used. Flip the trays over and put masking tape on the bottom of a corner cell of each tray. For now, put it on the right corner cell of each tray. This means, with the cells upside down,there will be 3 empty cells, then a taped cell with a number 1 on it, then 3 empty cells and a taped cell with the number 2 on it etc. until the last cell on the right on the other side is labeled with the number 15.It makes no difference if the label is on the left of a tray or the right. Just be consistent. Do the same to each tray.The end of the tray that the label is on is inserted first into the indexer if one is about to plant the first range and last if one is on the other side of the field about to plant the last ranges to the first range.
The trays are flipped back over so the cells can be filled with seed and laid out from the left side of the table to the right. Then move around the right end of the table so that from this other side the table now extends to the right. (The fold is on the right end of the table when standing in front of the first 10 trays on the one side of the table). Continue laying trays on this other side from left to right. 5 trays are so placed.
Return to tray 1 and place a physical barrier that prevents movement around the table on the left from tray 1 to tray 15. It is easy to remember not to go around the table on this end when one side has only a few trays. Sometimes though, there can be an equal number of trays on each side of the table.
Place the Planting Plan in front of you. Pick up a white cardboard tray of seed envelopes from the large trays labeled for the field. Always hold the tray of seed envelopes sideways (parallel to the edge of the table) and close to you and never over the planting trays on the table. If seed should be spilled, let it fall on the floor rather than into planting tray cells/envelopes empty or filled.
Consult the Planting Plan in front of you on the table. The first cell to be filled is on the extreme bottom on the left end if you are standing in front of the first 10 trays. The white cardboard tray holding the seed envelopes should contain 2 envelopes with the first plot number on them. The envelopes should be taken out one by one in the order they are placed in the tray. (This is to keep one from picking envelopes out two at a time and changing their order for fields with single row numbering).
Take out the first envelope, ensure it has the correct plot number and pour its content into the first cell. DO NOT OVERFILL THE CELL. A metal cover has to be placed over the cells of a plastic planting tray after all the planting trays are filled. Seeds that are higher than the rim of the cell will be pushed into other cells when putting the cover on. This is not at all acceptable.
Pour the second envelope into the second cell (to the right of the first). The seed of these two cells are identical because they are the same variety in two rows.Continue filling cells along the first range to tray #10 then imagine the fold and continue filling the first range of cells on the other side of the table from left to right to Tray #15. DO NOT go around the right end of the table when standing in front of the last five trays. Check the Planting Plan regarding the Plot# on the extreme right of the first range. Make sure it matches the last two cells filled. The next cell filled is directly above the last cell filled on the extreme right when standing in front of the last five trays. Continue filling trays moving in the opposite direction from before. Now move from right to left in the second range of cells until reaching tray #1 and filling the extreme left cell in range two.
Using the plastic trays, knowing where one left off when a white cardboard seed envelope tray is emptied is simple since the next cell to be filled is an empty cell beside a filled cell. For the large brown cardboard planting trays with 10 white cardboard trays in each box, it is difficult to know where one left off. One way to mark where the last filled place was is to put the empty seed envelope tray on top of the last filled position with the rest of the seed envelope tray over already filled cells.
Range three is filled starting at the cell in the third range on the extreme left when standing in front of the first ten trays. Range three is filled moving left to right the same as range 1. NOTE: DON'T go around the left end of the table from Tray 1 to Tray 15.
The process of filling the planter trays in this serpentine pattern is repeated until all the ranges have been filled as per the Planting Plan. Consult it at the end of each side of a range. (WIth the cardboard trays and envelopes one can easily miss a place.)
Once the plastic trays have been filled according to the planting plan, the covers can be put on. Be very careful not to push seed from one cell into another cell.
For the cardboard planting trays a Planter Checksheet is needed to verify that the seed envelopes have been placed properly. This is just an expansion of the Planting Plan to show all plot#'s. The columns of plot numbers are compared to the contents of the white trays checking each set of two trays from range one to the last range. The two trays should match because each seed envelope is one row of a two row plot. If one of the two trays has 18 envelopes and the other has 19, there is a problem. Or if the 10th envelope of tray 1 is for Plot#200 but the 10th envelope in tray #2 is for Plot#306 there is also a problem. Try to make sure an envelope is placed behind all previously placed envelopes and not slid in front of a previously placed envelope.
The check of the white trays is perpendicular to the direction in which the trays were filled with seed envelopes so this is a cross check of sorts.
The Planter Checksheet can be formatted in pairs of plots with several pairs of columns on a page.
When the cardboard trays have been verified to be correct, a post-it note or masking tape and marker can be used to assign a Bean Nursery name or location and tray numbers in numerical order to each tray. The trays can be stacked with higher numbers below lower numbers so the trays are planted from 1 to n.
More than 18 ranges
If more ranges are needed than can be fit into the plastic trays (18) or the cardboard trays (25?), this is handled by using a second set of trays above the first set and labeling the first set as A and the second set as B. Tray 1 A might hold the seed for ranges 1-18 of the first 4 rows/columns and Tray 1B would hold the seed for ranges 19-36 of the same first 4 rows/columns. The Plot #'s in the first range can be used to indicate the field row/column.
The operator of the planter will have to stop at range 18 (plastic trays) on every pass so Tray B can be loaded.
Field Preparation (Part 2: Field Work)[]
Seedbed creation (Part 2: Field Work)[]
Application of Nitrogen (Part 2: Field Work)[]
- Urea was not applied to the Bean fields but a small amount of fertilizer was applied at planting since rhizobium was not added to the seed as it would be in a commercial setting. Note that there is more than one type of Rhizobium and that one type might be better for a bean variety than another.
Measuring and Marking Ranges[]
- From the side where the planting will begin and with the heel of a boot, make a mark parallel to the field edge and possibly road and about 1 foot in. This represents the first row of the headland. You also want to be about 50 ft. in from the left side if planting from left to right. You need this room for turning the tractor around in the field when marking the ranges. Pull out a tape to a width that matches the planter width. Make a heel mark and continue measuring the headland for the planned number of planter passes for the headland. From the last mark, add and mark 1.5 feet and place a small wooden stake at the mark. The stakes are about 1/4" thick,1" wide and about 12" long. This stake is in the center of what will be the 3 foot pathway in front of the first range. It may be necessary to angle the stake both vertically and horizontally to catch the sunlight. If possible use stakes painted white.
- From this first stake, the ranges are going to be marked off on this side of the field. One person will hold the tape at the range width with the thumbnail on the range width number. The other person has a bundle of stakes and holds the front end of the tape.
- A small stake is held next to the front of the tape in such a way that the stake can be placed in the ground in one movement down to the ground. The stake is placed so the width parallels the tape and its center is on the end of the tape.
- The measuring pair of people then move forward until the second person is at the first stake and the measuring tape is taut. One or both yell out the range number "ONE!" at the same time that the first person places the second stake. Then the pair move forward until the second person reaches the second stake and both say "TWO" as the next stake is placed. This continues until the required number of ranges are staked out. The measurers need to move perpendicular to the field edge as much as possible perhaps by sighting out a distant object. Stakes should also be placed several feet outside the desired side of the field. This will ensure the marks will be made a bit outside the planned area and can be seen when planting the first and last passes.
- After marking the first side of the field, the other side of the field is marked so you will need to know how far to go across the field based on your previous measurements and final Planting Plan.
- The ranges can be marked out starting from the far end of the field or the near end. A third set of stakes may be needed between the 2 outside stakes to help keep the tractor driver going straight when marking the ranges.
The ranges are marked using a two disk marker with the disks set about 3 feet apart.
- The driver lines up with the 2 stakes marking each side of the field in the center of his path and possibly also using center of range stakes and drives to the far stake on the other side as the disks mark a three foot pathway. At the other side, the tractor operator lines up the second set of stakes. It may be necessary for someone on each side to stand behind stakes to help the driver see the stakes and not also miss a stake and drive diagonally across the field. Marks should be made a little past the stakes so one can see them off to the side as the first and last passes are made with the planter.
Once a range has been marked, the stakes for that range can be removed. The stakes can be removed as one moves up the ranges on one side.
PLANTING[]
Nursery[]
- The Bean Nursery is prepared and planted the same as for the Maize Yield Trials but with shorter ranges and check seed every 25 plots. There were usually about 1200 plots of two rows per plot. The last 10-20 plots were usually used as single rows for new material that was planted by hand after the Nursery was planted.
NOTE: Replace material in planting envelopes that is too large for the planter with empty envelopes. Plant large seeded material by hand in the designated plot rows.
- The last range with 20 rows empty is for seed from new crosses made in the winter, new material and material to be crossed in the field in the summer.
Observation Rows[]
- One or two rows each variety partway down the field. Possibly 2 ranges with a path between.
Yield Trials[]
- Solid Seeded
- Navy beans planted with a drill.
- Rows
- Similar to planting maize populations. Set planting rate for each bean size.
4 rows each variety partway down the field and 2 rows each for varieties with only a limited supply of seed. Spin out the planter boxes for each variety similarly as for the MAIZE POPULATIONS.
Loading the trays onto the planter[]
Envelopes[]
Have a small notebook handy for recording things like planter settings or location of misplants etc.(By planter settings, I mean the two sprocket sizes used to set the plot length). Also, bring the planting plan and the planter checksheet to help if there is a problem planting. Know the direction of the first range from the Planting Plan and imagine it as a number line at the front of the field. The envelopes at the front of the small white trays should be in the same proper sequential plot number order in the large brown trays.
Planting Bean Nurseries is easier than inbred rows because each person is planting two rows of the same seed and plot number. If the envelope in the left hand is poured into the cone on the right, it is not a problem. As long as the envelope in the right hand was poured into the cone on the left. However, it is best to enforce the rule against crossing sides with seed packets so that there is no trouble when planting the Inbred Nursery later.
The large brown trays should be packed for shipping so that the first ten rows are on top and can be used first followed by the next ten rows etc. First, place bottles for the first eight rows. For the first four rows, the bottles are put in front of the first envelope. For the next four rows, the bottles are placed behind the last envelope. Each time you complete a round, you will do this to the 8 small white trays you pick up for the next round.
Don't even think of ever trying to take all 8 small white trays to the planter in one trip! Take 2 or 4 trays at a time,whatever you can handle without spilling, and maybe arrange to have the other person or the driver help you.
Here is the tricky part. Each small white tray of the first four rows must be individually spun 180 degrees so that the bottle is away from you and the back of the envelopes are towards you. It's best to do this in the large brown tray so that now you have 8 rows with bottles away from you but the first four rows have envelope backs to you. Now the trays are in the proper order as viewed from the back of the planter.
Next, I pull the first four trays out as a block. I put my hands on each side of the ouside trays and press gently towards the center as I lift up and get my fingers under two trays on each side. Don't press the trays too hard together or they will buckle upwards and spill. You can also take them out two at a time.
Give the 2 trays on the right to the person on the right side of the planter and then put the 2 trays for the left side in their proper boxes on the planter. Return and get the next four trays for the round. Don't change the sequential order of the next four trays or spin them around. Place them in the fertilizer box with the bottles to the back of the planter and make sure they are positioned and supported so they won't spill.
Check that the 2 plot numbers match for each side. Each person can check their two top envelopes behind the bottle and the one person can sound off regarding the plot# and that the match is ok. The plot # should be one higher or lower depending on the direction of the first range.
The general rule for planting envelopes is TAKE IT FROM THE TOP. Always draw the next envelope from the top of the tray. This is the envelope farthest from you. Don't take an envelope from the bottom of the tray. The reason envelopes are taken from the top is because when envelopes are taken from the bottom, there is pressure on them from the bottle and the other envelopes that makes them rip on staples or pull other envelopes out with them when they are taken out.
When you are confident the envelopes are in their proper rows on the planter, draw the top envelopes from your two rows. Draw the left envelope with the left hand and the right envelope with the right hand. Look at the plot#'s. They should be the same.You can sit them on your lap to help get a better grip on them or to be ready. Pour each envelope into its respective cone. This is the signal to the other person that they may do the same. When they are finished, and you are ready to go, check with the other person that they are ready to go and if so, give the signal to the driver to pro seed(pun intended!).
When the planter is in the proper position with respect to the first range marker line in the soil, press the button to drop the seed. Push the button confidently and firmly. If you press it quickly as if you were afraid it would shock you, the press might not register at all and the seed won't drop. If you press slowly, it might register as two presses and seed just put in for the next range may drop in with seed of the previous range. This is a problem someone can work on.
Get the next two envelopes and pour them into the head ready to be dropped onto the cones. You should be about in the middle of the range or even three quarters through if you had some problems pulling the envelopes out. Get into a habit of press and fill,press and fill. If you don't, you will be doing something else and miss doing one of the two. Don't do anything else like sounding off to check the plot#'s or checking the cones until the head has been filled.
NB: Locate the marker line for the end of the first range and the marker line for the start of the second range. The two lines should be separated by 3 feet while the other lines are separated by about 12 feet. For short plots like in the bean nursery, it can be confusing to know what is path and what is plot. Prepare to press the button when the planter is in the proper position with the second of the two range marking lines ahead. This is the line marking the start of the next range. Don't use the line that marks the end of the first range or you will be planting into the pathway. Sometimes you can note whether seed is still being planted in the cone from the first range. All the seed should have gone down the hole before you press the button.
When the planter is in the proper position for the second range, press the button,get the next two envelopes and fill the head.
Things to check for[]
- Do the plot #'s match for your pair of envelopes?
- Is the plot# being planted by the other person in the same range as yours?
- Is the cone working properly?
- Is it going around at a steady pace or is it stopping and starting as if it's catching on something?
- Is all the seed out of the cone before the button is pressed?
- Is all of the seed dropping onto the cone?
- Is the seed evenly spread around the cone?
- Are the cups working properly to drop the seed?
- Is the cup opening and closing properly?
- Is the cup opening and closing when the button is pressed?
- Is the cup opening and closing more than once when the button is pressed?
- Is the seed being spread evenly around the cup before being dropped?
Make prior arrangements with the driver regarding what signal will be used to have him stop at about the 5th or sixth range to check seed placement and depth. Stop the driving after a range has completed planting and before starting to plant the next range.
The main correction to be made will be regarding when to press the button. After checking the seed placement the driver will have to back up a bit to get the cones moving before continuing the planting.
In the last few ranges you may encounter empty envelopes. It may seem stupid but just go through the motions of pouring them into the head as if they contained seed. The reason for this is that it maintains the routine of press and fill. Otherwise, with nothing to do, one will be looking at something else and forget to press the button. It also helps ensure that everything is in its proper place especially when starting from the empty range.
Try to see where the last seed of the last range drops to get an idea of the range length and where the range is starting in relation to the marked lines. The driver will turn the tractor and get into position to start the next pass and then stop and lower the planter.
Here is another tricky part.Take the next four envelopes from the fertilizer bin. The bottles should already be in the right places but the two trays on the left will be put on the right side of the planter and the two trays on the right will be put on the left side of the planter. Have in your mind the first range number line and how it would look from this end of the field. The plot#'s must go in the same direction as the number line. If the number line is moving from west to east, the plot numbers on the planter should also increase from west to east when looking from behind the planter at the plot#'s on the envelopes nearest the people. The plot#'s nearest you are planted last into the first range at the other end of the field.
Plant the second pass of the first round the same as the first pass but with corrections for seed placement. Check part way down the field how the seed placement is. Check for a few more passes and when it looks good, stop checking.
Plastic trays and Automatic Indexer[]
The trays are shipped to the field in the order they are to be used. Each tray has one end marked with the tray number. The planter has storage space for a dozen trays or so. Ensure that the tubes from the indexer holes to the heads are going to the correct rows. The tray is inserted with the metal covering on the bottom. This means that for a left to right first range, the seed for row 1 falls down the hole farthest from you and the seed for row 4 falls down the hole closest to you. For a right to left range, the seed for row 1 falls down the hole closest to you and the seed for row 4 falls down the hole farthest from you. The cones on the planter are marked from behind from left to right as 1 on the left and 4 on the right. If the first range is from left to right, the seed for row 1 falls into cone #1. If the first range is from right to left the seed for row 1 falls into cone #4. The first tray is inserted into the indexer with the numbered end first and slid from left to right. The metal covering will hit a metal ledge but the tray will keep sliding. Position the tray so that the first gap between cells is directly below the indexing bar that advances the tray one cell to the right each time the button is pressed. I don't remember if this is after the first set of four cells empties down the holes or if you must advance the tray to the holes. Either way advance the tray so that the first set of four cells empties into the heads below. The indexer and the button that is pressed to activate it have been troublesome at times. If the tray is not positioned properly, the bar of the indexer will crush the cell and the indexer will have to be taken off with wrenches and repositioned. It is very important to press the button firmly and confidently. If the button is pressed very quickly, the press may not register and the indexer won't advance the tray one cell to the right. If the button is pressed too slowly, the press may register as two presses and seed from 8 cells will be mixed together in the heads.
There is another button for the horn to notify the driver to stop if there are any problems. This is usually if the button doesn't work properly and the tray doesn't move or moves too far. Sometimes, the cones may not be working properly, but a disadvantage of using the automatic indexer is that the operator is too far up and too busy to see how things are going. You could have two other people in the lower chairs checking the cone operation.
When the operator of the indexer is ready, the signal is given to the driver to pro seed or make it sew. Usually, the position of the marker arm on the planter in relation to the range marker line in the soil is used to determine when to press the button that advances the tray one set of cells to the right. Note that this position will have to change with the speed of the tractor. At the other end of the field, the next tray is inserted with the number of the tray on the left. So the plots of the first range are planted last. Often a field is not 24 ranges long so there are empty cells in a tray. Sometimes there are only a few trays with empty cells for the last few rounds of the planting. If there are empty cells, the tray must be advanced to the proper place to begin planting. If the last range was completely filled, the tray can be advanced to the first cells with seed. If the last range has empty plots, the first cells, possibly empty, are the ones of the last range. E.g. the trays hold 24 ranges. The last range is 18 but there are empty plots on one side of the range. Position the tray so that 6 empty sets of cells have passed through. The next cell will be empty and correspond to range 18. Depending on the circumstances, you can advance the tray past the empty cells for range 18 and move the planter to range 17 before starting to plant. Note, however, that no fertilizer is being placed for the empty plots. Otherwise, start the planting for range 18 as for any other start from a field end,press the button at the proper time to move the tray one set of cells to the right, and prepare to plant the seed of the next set of cells at the proper time and place in the next range. This method, however, places fertilizer into the empty range and marks 4 rows. When the entire Bean Nursery Field has been planted place flags to mark the corners of the field.The marker flags are about 3 feet high and made from stiff wire and a small rectangle of brightly coloured plastic. They are available in bundles from agricultural supply stores.
Making a straight first row[]
The basic method of planting a straight first row is to mark at both ends of the field and between, where the first row is going to be, and put up large white stakes where the center of the planter will be to guide the driver. After marking where the first row should go, measure across to where the center of the planter should run and place a large white stake. Do this for a point further down the field and for a point at the other end of the field. Take a sight from behind the first stake to the last stake and correct the position of the middle stake if it is not in line. The driver should make sure to put the planter marking disc down.
Checking seed depth and location[]
- The seed depth and plot length should be checked on the headlands or some other place (where stray plants pose no problem) prior to planting the Bean Nursery plots.
- For the first few rounds of planting the Bean Nurserys the driver and the people on the planter should periodically check the placement of the seed. The driver must work together with the planters. Plant about 4 ranges and stop before planting the fifth range. First, check the seed depth in all rows and make adjustments to the planter if needed. Then check the location of the seed in several rows to find where the first seed dropped to where the last seed was planted for the range. The different colours of fungicides and insecticides on the seeds can help.The wooden stakes work well for exposing the soil to find the seed. Once one learns where to look on the planter track it is pretty straightforward. Remove the first inch of soil using the stake sideways and then use the point to find the narrow channel that the seed is planted in and slowly flick soil away until a seed is exposed. Be sure to replant and cover the seed.
Determining if the poor placement of seed is because the plot length is too long or too short or if it's because the seed is being dropped too early or too late is a bit tricky. If the seed was dropped after the range marking line and the last seed is several feet before the next range marking line, the plot length is too short. If the seed is dropped close to the range marking line and the last seed is well into the pathway between the next two range marking lines, the plot length is too long. If the seed is dropped a foot too soon and ends a foot short of the range marking line for that range, the plot length is perfect but the cue to drop is too soon. If the first seed found for the range is a foot past the range marking line and the last seed is a foot past the range marking line, the plot length is perfect but the cue to drop the seed is too late. If the seed is dropping too soon or too late, adjust the point used for determining when to let seed drop.
Sound off[]
Sounding off is just announcing to the other planter what plot#(s) was just dropped into the cone. It’s a double check on the plot #'s within a range. It’s most useful in the Inbreeding nursery but it doesn't hurt to use once in a while when planting the Bean Nursery. Do a sound off before starting at each end of the field to make sure the trays were properly placed on the planter and are being picked from properly. As long as the other plot# is one higher or lower, the planters are planting the same range. If one of the plot#'s is not one higher or lower, an envelope may have been missed and not planted or planted in the wrong range.
Comments on planting speed vs. growth[]
- A speed of planting that is the same as an agricultural producer would use is ideal. However, proper placement of the seed is paramount. The driver of the planting should not go faster than the person(s) doing the planting on the back of the planter. A plot that is 5 feet out of its proper range is no good to anyone. Nor is a plot with large 10" gaps because the planter went that far before the next seed fell.
Going slow possibly gives a growing advantage to plots so the driver should try to drive at a consistent speed. It is better if all the plots are planted well than if all the plots are planted poorly.
- The person(s) on the planter should work as quickly as possible without making mistakes. A speed of planting that is too slow can easily lead to more mistakes because someone has shifted their attention to something else while waiting to pour seed into the planter or to press the button to put the seed in the cones. Find a comfortable speed to work at.
Misplant[]
- If there is a malfunction of the cones, stop the planting. Seed from cones can be obtained by catching the seed below the planting tube as the cone is spun manually.
If the seed has different colour insecticides, it can be sorted out and planted again with the planter, or planted manually. If there is no way to distinguish what seed belongs where, the plot will have to be left empty and reseeded later with a check variety or possibly new seed obtained from the sponsoring company. The location of a misplant should be noted so that people can be vigilant later regarding the possible existence of carry over plants in previous ranges.
STAKING THE PLOTS[]
- The method of placing the stakes for the Bean Nursery is the same as for the maize yield trials.
- The stakes are about 8" x 1" x 1/4". Stakes painted white are nice but not necessary. The plot numbers can be put on at the office using black Sharpie markers. Test any new permanent marker to be used on stakes in the field before using it to mark plot numbers. Sharpie markers almost seem to create a tatoo in the wood so the numbers stay on after a lot of weathering.
- Each stake should be placed on an angle between 45 and 60 degrees and far enough ahead of the first plant of the plant row that it is not going to interfere with the growth of that plant.
- Lay the stakes for one side of the field out on a table with the pointed end on the right and the square end on the left and write the plot numbers on from left to right as per the planting plan and bundle these stakes together from first range to last range. Do all the plot numbers for the other side of the field and bundle them from last range to first range. Do plot numbers between the two sides. Decide if you are going to use stakes at every fifth plot# or every fifth file (vertical row on a page) of the first range.
- For every fifth plot, the stakes will be staggered in the field if the range width is not a multiple of five and there might be stakes beside each other on the sides.
- For every fifth file, stakes are placed at plots in the first range that are multiples of five. The stakes in the next range mark the plot directly behind the staked plot in the first range but the stake will be on the opposite side of the plot because of the serpentine pattern of plots. Putting stakes in by file works the same way as putting the stakes for one side in from first range to last by walking down the middle of the plots. Staking by files is easiest to work with in the field, but makes numbering the stakes difficult if the required plot numbers have not been worked out beforehand.
- Remember that the plots are two rows and are in a serpentine pattern so if the far side stake in one range is 50 and on the right side of the plot, the stake in the next range will be on the left side of the plot to mark plot 51.
- Put the stakes in for one side moving from first range to last and then put the other side stakes in moving from last to first range.
- Put in the stakes between the sides, moving across the ranges in a serpentine pattern according to the planting plan or use the file method.
Notebook-Beans[]

Bean Nursery Notebook covers
- Light Blue Pasteboard Cover (ACCO Two-prong binding covers)
- 3 line title: 1995 Bean Nursery, Observation Rows, Yield Trials
- Contact information on the inside front cover
- Landscape pages (11 in. x 8.5 in.),2 holes on the left side
- Days from Planting list on inside back cover
- Possibly a table of contents stating what is in the book and which Nursery plots
contain specific types of beans.
- E.g.
- Bean Nursery
- White Beans: Plots 1 - 245
- Black Beans: Plots 246 - 399
- Kidney Beans: Plots 400-450
- New Crosses: Plots 451- 460
Followed by:
- Bean Nursery Planting Plan page
- Observation Rows Planting Plan and Yield Trials Planting Plan page(s)
- Days from Planting page
- Possibly a page showing name abbreviations and pedigrees of newly named crosses.
- Name Pedigree (FORMATTING PROBLEM FOR COLUMNAR TEXT)
- B12 (Envoy*Mitchell*Mexican Red)
- B17 (B12*(Cranberry*Dutch Brown))
Notebook Page There is a title line showing the YEAR, NURSERY (Bean Nursery, Bean Observation Rows or Bean Yield Trials (solid seeded or rows) ), LOCATION and DATE OF PLANTING.
Column headings used were (left to right): PLOT#, FAMILY, PEDIGREE, SOURCE, WEIGHT, SEED REMARKS, VIGOR, DAYS TO 50% FLOWERING, DAYS TO MATURITY, DISEASE, STAY GREEN, YIELD, WEIGHT, 2 empty columns and a REMARKS column about 3 inches wide. The column headings were abbreviated to about 4 or five characters. Use perforated lines after each record whose plot number is not a multiple of 5.
On each page show 25 plots/records per page with double underline or thicker line every fifth plot.


BEAN POLLINATIONS[]
(See HYBRIDIZATION OF CROP PLANTS (1980) pp. 273–284 )
- Grow the plants
- Field method
- Greenhouse method
- Hydroponic method
Equipment[]
- Surgical forceps or tweezers
- permanent ink marker
- pen
- small white tags with string (merchandise tags)
- magnifying eyeglasses or some other magnification device
- 95% alcohol (for sterilizing forceps/tweezers between different crosses)
The forceps or tweezers should have a fine point but have flat sides with a sharp edge for cutting and grasping
Pen ink will not be visible later if pollinations are done outside. Even permanent marker on a paper tag can wear off in the rain.
Make a pollinating kit with all the equipment together. I put mine in an old lidded, rectangular, plastic container for paperclips but it was a bit cramped inside.
Some references refer to the use of camel hair paint brushes. I've never tried that method.
Parts of the Flower[]
An illustration would be best here as well as working with a dozen flowers taken from bean plants.
Beans are self-pollinating. They contain both male and female reproductive parts. To make a cross between two different plants and to be sure the offspring are not the result of self pollinatiion, some flowers are emasculated (the male parts called the anthers are removed) and designated as female flowers and other flowers are designated as males.
Emasculation[]
It's best to emasculate when the flowers are medium to large buds rather than after they become flowers. If the flower has opened, it can still be used if and only if the anthers are immature (no pollen)
- 1) Pry open the bud at the seam where the bud will open (hold bud with thumb and forefinger - careful not to break or bruise the stem)
- 2) Remove wings of flower (if flower has bloomed,snip wings with edges of tweezers.Otherwise, remove small pieces at a time from each side of the bud
- 3) remove thin membrane of keel in spiral motion,a bit at a time
- 4) remove the anthers. keep a count of the anthers removed (6 in beans?)
- 5) double checkusing tweezers to probe to make sure all anthers removed
- 6) DO NOT BREAK STYLE!
- 7) Close bud if not to be pollinated right away. Don't let bud dry out
- 8) Methods exist to keep the bud from drying out.
Pollination[]
Hook Method[]
Find a flower with a hint of yellow in the keel or a well developed flower. Snip the wings and remove the keel. If the anthers are withered the flower is too old. The anthers should be yellowish. A person might even see a bit of dusty pollen when the anthers are moved. If the anthers have not dehisced place them near some heat for a bit to open them.
Snip the style about a quarter inch from the stigma of the flower and rub the stigma in the anthers
Then rub the stigma against the stigma of the emasculated (female) flower and hook the two together. A few anthers from the male flower tangled into the stigmas is o.k. too.
After making this cross, record the cross on a small tag with a permanent marker and loop the strings of the tag around the stem of the flower. Don't put all the weight on the stem though. It might break off with the flower. The first loop is needed to keep the identity of the flower the tag belongs with. After that the string can loop around stronger parts of the plant below the stem of the flower.
When writing the tag, write the male first on the top line, then an X for "Cross", and then the female on the bottom. Note: This contradicts a convention in which the seed parent (female) is written on the top and the pollen parent on the botton. This creates confusion but was found to reduce confusion for pollinations of maize where the pollen comes from above the female inflorescence.
If the cross is written on one line, such as in the notebook, write the female first, then the male, with an X between them.
FORMATTING PROBLEM FOR VERTICALLY WRITTEN CROSS
- MALE
- X
- FEMALE
- or
- FEMALE X MALE
- On the back of the tag, write the date the pollination was made and even the initials of the pollinator if there was more than one pollinator.
Harvest[]
Bean Nursery[]
Select desirable single plants from the Bean Nursery plots. If the variety looks very bad you might select 0 or just 1 plant. For really good varieties, select 4 - 6 single plants per 2 - row plot depending on the variety’s characteristics. Pull the selected plants out by the roots by grasping the stem near the ground and pulling. Place each plant in a small red mesh bag leaves first and possibly folded in half with the root sticking out the top. Put the bags for a plot into one medium size mesh bag with a red or light blue cardboard tag with the plot number written on it with a marker. We may also have put the letters SP on the extreme left of the tag to indicate a single plant. Close the medium size mesh bag and spin it so that the draw strings form a single tight cord. (Actually I don’t remember if we used the medium bag. We may have put tags in each bag, pulled them all tight and then twisted all of their draw strings into a single cord and made a looped half knot in that cord.)
Make a pullable half knot close to the bag opening. Such a knot is made by pulling the middle of the cord as a loop through a circle made with the cord rather than pulling the end through the circle to make a half knot. Pull the cord tight around the middle loop so the bag doesn’t come undone or loosens. Leave the bag at the front of the plot between the plot’s rows but in the middle of the pathway where it can be easily seen.
Take a bulk from very good plots that you want for observation row seed increasing or yield testing the next year. Pull all of the plants in the plot by hand and let them dry out. You might want to risk letting them dry for a few days. Then stuff them all into large mesh bags. Put marker labeled cardboard tags that state the plot number and the total number of bags harvested from the plot. E.g. BLK 465 (1 of 4) . If the risk of frost is slight one can also wait until the bean knife on the tractor is used to pull all the plots. Clean off the bean knife just before it gets to the range with the plot you want pulled.
Pull New material and new crosses by hand and put each plant into a small red mesh bag with a plot numbered cardboard tag. Make sure you get all the bags on the pathways when you are picking them up later.
Observation Rows[]
Pull the plants. Group by segregates, if any. Put the piles of plants in large mesh bags with appropriately marker labeled cardboard tags that state the plot #, and number of bags of that selection. . Pick up all the bags in the Bean Nursery by going across each range to one side picking up bags as you go and then putting them in the back of a pickup truck moving down one side of the Nursery. Pick up the bags for the Observation rows as well and take all the bags to the storage area.
After all of the harvest bags have been picked up and taken to storage, the tractor was fitted with bean knives that pull and cut the bean plants so that they can be picked up by a windrower and/or combine. The bean knife pulled two rows at a time and threw the two rows together in one windrow. It also would carry plants across the pathways into the next range so if you wanted a bulk sample of a plot, you had to be careful that the correct two rows had been windrowed together and that no plants had been carried across the pathway from the previous range. You might want to keep different bean types separate because of problems selling a load of mixed colour or mixed type beans. Use a pitch fork to separate plants in the windrows and put them in a pile to be avoided by the combine or combined at a separae time.
Yield Trials[]
The Yield Trial rows were cut with the bean knife (two knives attached to the loader arms of the tractor) and then something like 20 feet per row was taken from each variety/entry as a sample. The plants were stuffed into several large mesh bags and taken to the storage area and threshed almost immediately. If the threshing area is close, one could use a wheel barrow. If you have a plot combine for beans you can harvest each variety separately and fill bags in the field.
THRESHING[]
The Observation Row bags and Bean Nursery single plant and bulk bags may be put in the drying cupboard if the seed has a high moisture content. Usually the beans were dry enough at harvest to just put in the storage area.
There was one variety that were threshed by hand in the field by putting a tarp down on the ground and stomping all over the plants to thresh them. The straw was picked up with a pitch fork and thrown to the side. A scoop shovel was used to put the seed in 100 lb. bags which were then taken to the storage area and winnowed.
The Yield Trial samples were threshed in the storage area as soon as harvested. The plants were threshed with a home-made “hedgehog” spiked-tooth cylinder thresher, cleaned with the homemade winnower and put into small or medium mesh bags that had no holes together with at least one of the plot number tags. The collected weight of seed was recorded for each Yield Trial variety and entered into the notebook. Many yield trial bulks eventually ended up in the pot for supper.
The Observation rows and Plot bulks were threshed the same way as the Yield Trial samples and the bulk weight of seed of each variety or plot was recorded in the notebook. I don’t remember how the straw was disposed of but I think it ended up being strewn across a field.
The Bean Nursery single plants were taken to the workroom, threshed by hand and the beans placed in # 6 envelopes on which the year(?), plot number and single plant number was recorded with a marker. The procedure was similar to that for shelling the maize inbreds. The bags were grouped by plot number into piles of hundreds and then groups of tens and then from lowest plot number to higher plot number. Loose beans in the bag were discarded since they could be from another plant if there was a hole in the bag. The plant was pulled from the bag and put on a rectangular pan with a #6 envelope properly marked with at least the plot number and single plant number. I think the pods were plucked off the plant and put into the pan. Then the pods were crushed together and removed, leaving the seed. The seed of each single plant was then poured from the pan into the properly labeled envelope. The number of single plants was recorded in the notebook. (Actually, I think this number was recorded when the plants were selected, but if there was a change, it would need to be recorded in the notebook). Some remarks about the plant, pods or seed might be made at this time as well and put into the notebook.
The envelopes were put into cardboard trays about half the size of the cardboard planting trays. Each tray held two envelopes across with a cardboard divider about 4 inches high between them. I think bottles in front of the envelopes or behind them were used to keep the envelopes from falling over until all the labels were placed but I don’t remember.
Information regarding the #of seeds, seeds per pod (if recorded), total amount of seed in the envelope (g), as well as a seed size expressed as so many grams per 100 seeds needed to be recorded (usually on the inside of the back of the opening flap), added to the computer and put on the label to be printed out and put on the envelope.
The canners prefer a bean size of 18g per 100 seeds.A seed size of 22g per 100 seeds would be rejected as too large. So you need to know who you are breeding for.
At the very least one might weigh each envelope to get a rough figure for the amount of seed and recording the figure on the back of the envelope. It’s very easy to subtract off the envelope weight in a spreadsheet by using a subtraction formula if you want to be more exact.
Otherwise you have to work with each envelope separately, and using the unit counting feature on the balance, get a figure for the number of grams per 100 seeds, number of seeds per envelope, and the total weight in grams of all the seeds in the envelope.
It would be so nice if the balance and computer were at the last station in the threshing line (maybe behind a window) so that the seed got placed in the balance to get a seed size and then all of the seed was weighed and poured into the envelope while the computer printed out the complete label from behind a window and the label was then put on the envelope. It would also be nice if the computer put the Year, Plot number and full Pedigree on the envelope at the start of the threshing line so that one could avoid transcribing errors. It’s very easy when writing out several envelopes with the same plot number but an increasing single plant number, to start increasing the plot number before one should. This kind of mistake shows up when labels are being put on because the computer notebook record of the number of single plants per each plot and the envelopes don’t agree so there are labels without matching envelopes.
INVENTORY[]
Bean Nursery[]
Title: 1995 Bean Inventory
Usual header for Bean Nursery Notebook Format Inventory:
- Plot#, Pedigree, Source (year as column heading and plot number in cells below), # of single plants
First Source year pedigree might be a bean family name or the name of a person or research center rather than a row #. E.g. B19, B27, Joe Beanbreeder, Guelph.
The single plant pedigrees are created the same as for maize inbreds.
Crosses require putting the separate pedigrees of the parents together.
Bulks are designated with -BLK or BK. The weights of bulks are recorded and listed in the inventory beside related material.
Bulks of observation material are usually listed separately from the Nursery.
Yield Trial material is thrown out once the required data is collected. This may mean into a bag to put into a pot for supper.

Bean Pedigrees[]
Bean Nursery Pedigrees[]
From each 2 row plot, single plants have been pulled and possibly a bulk for testing purposes. The pedigrees and labels are created similar to single cobs from a row in the maize Inbreeding Nursery.
Single Plants[]
The number of single plants pulled from each plot should be listed in a column in the notebook. Often it is to the immediate left of the remarks column. Check for changes made to the notebook in pen and make sure the Computer version matches the notebook version. Add 0's for any plot that had no single plants pulled. The 0's will hold the place and keep things aligned. Enter the # of single plants for each plot in a column. This list can be used as a preliminary Inventory until the pedigrees are prepared for all of the seed. A sum of the number of single plants can be used to get an idea of the size of next year's nursery and how much the breeder will have to decide to leave out to maintain a proper size.
For each plot, follow the "dash n method" to create the new pedigrees. For each of the n single plants, add -n to the pedigree. This is a slight variation of the Jacoby decimal system.
FORMATTING PROBLEMS
| Row | Pedigree | Single Plants | |
|---|---|---|---|
| 563 | B10-3-4-5 | 3 |
Pedigrees on Seed labels
- B10-3-4-5-1
- B10-3-4-5-2
- B10-3-4-5-3
Next, information regarding the seed for each single plant is entered. Be sure the data is for the correct single plant. Usually, this data is a total weight for the package of seed and maybe a weight per 100 seeds. Any other desired data can be added such as number of beans per pod. The data can be put on the label.


Bulks[]
Pedigrees for bulks are created the same way as for the bulks of Maize inbreds. Add -BLK or -Blk or -bk to the pedigree to designate a bulk of the seed from a plot. This seed will probably be added to the Observation rows in the next year to increase the amount of seed to what is needed for a Yield Trial.
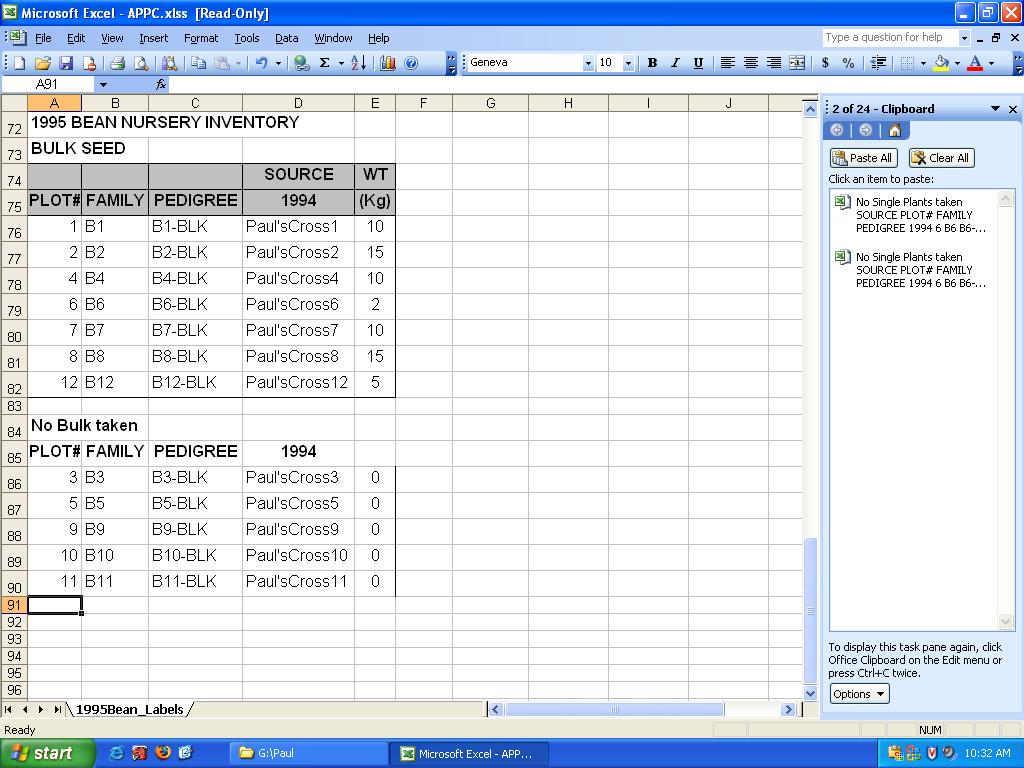
Observation Row Bulks[]
Seed from Observation rows is usually bulked together and -Blk is added to the pedigree. If single plants are selected out, their pedigree is created using the -n method. For pure seed, the bulk is a seed increase for next year's Yield Trial so not even -blk is added.
Yield Trials[]
Seed from Yield Trials is usually not kept. Yield Trial seed is usually quite pure so nothing is added to the pedigree if it is kept. A bulk designation can be added if desired.
Crossing Block Pedigrees[]
The pedigrees of seed from crosses is created the same way as for maize crosses. List the parents beside each other with an 'x' between. This may be done by row number until the pedigrees can be looked up. E.g. 23 x 1064 . After all the pedigree information is put together, create new designations for each cross of the same parents. E.g. New Designation: Bucky = All seed from crosses of Blue x Yellow. So there could be 3 pods of the cross Blue x Yellow or Yellow x Blue from one plant and 2 pods of the same cross from another plant. Don't bother distinguishing between male and female for now. The pedigree of seed from all five pods is written as Blue x Yellow = Bucky beans. There may be other pods on the blue plant crossed to green. These are different parents and a different cross. The pedigree for all pods of this cross is Bronco = Blue x Green. The two groups of seed are Bucky beans and Bronco beans.
Uncrossed Seed[]
Seed from pods that were not cross pollinated are next generation selfings. Don't distinguish between pods of the same plant for uncrossed seed (selfs). The plant is treated as a single plant and all of the uncrossed seed from that plant is bulked together but given a pedigree with -n added. E.g. 3 seeds of plot 1420 are planted. The pedigree on the envelope of the seed is B7-3-4-5-1-2. The 2 at the end of the pedigree means this is the seed of the second single plant harvested from plot 1420. All three of the seeds taken from the envelope and planted are B7-3-4-5-1-2. Each plant that grows from these three seeds is a single plant. Uncrossed Seed from the first planted seed is 1420-1 or B7-3-4-5-1-2-1. Uncrossed Seed from the second seed planted is 1420-2 or B7-3-4-5-1-2-2. Uncrossed Seed from the third seed planted is 1420-3 or B-7-3-4-5-1-2-3.
Crossed Seed[]
If flowers on the plants from the 3 seeds of 1420 are crossed to Bronco, then the pedigree of the seed of the pods from the cross is 1420 x Bronco or after the pedigree for 1420 is found, the cross can be written as B7-3-4-5-1-2 x Bronco. Don't add a selfing number to the pedigree of the 1420 seed planted.
Seed Storage[]
Bean Nursery SIngle Plant Seed was put into #6 coin envelopes with labels stuck on at the top of the envelope. The envelopes were put into cardboard trays about half the size of the cardboard planting trays. Each tray held two envelopes across ans something like 20 envelopes deep with a cardboard divider about 4-6 inches high between the two columns of envelopes.
Bulk seed from plots or observation rows was put in medium sized mesh bags without holes, or two bags inside each other for bulks. The bags were put into the small brown cardboard trays in plot number order one behind the other.
Large bulks were put in 5-10 gallon pails or large 100 pound type plastic burlap/jute bags. 2 cardboard tags were put in the pails or bags and the pails were labeled with masking tape and a marker on the lid and on the pail. A tag was stapled to a top corner of the large bags.
BEAN APPENDICES[]
- The Faba Bean (Vicia faba L.)
- A Basis for Improvement
- Edited by P.D. Hebblethwaite, NDA, Dip. Ag., BSc (Hons), MSc, PhD
- Senior Lecturer in Agronomy
- University of Nottingham School of Agriculture
- ISBN 0-408-10695-6
- planter illustration
- other illustrations
Bean Bookmarks
- There are lots of webpages on the subject of Beans so you can do your own search and follow links at other websites.
- Here are two websites: