| Warning: This page it's very incomplete, use this article, particular has very caution! Please help finish it this page! |

CEREALS[]
Seedlist Creation[]
- Individual Headrows
- Observation Rows
- Yield Trial Plots
- Germplasm Plots
- The Cereals are the first crop to be planted each year. In the local area they were usually planted in the last week of April or the first week of May. Prior to planting, the seed packets of heads collected in the previous year are brought out of the seed storage room and a seedlist is created from an Inventory list that the breeder has marked regarding what is to be planted. Sometimes only the seed of the first and second single heads collected from previous year's headrows were designated to be put on the seedlist and planted. You may also want to reserve a dozen plots for planting material to be crossed. Some of the plots for material to be crossed might be left empty and planted later than everything else. There may also be a few new germplasm accessions.
Headrows[]
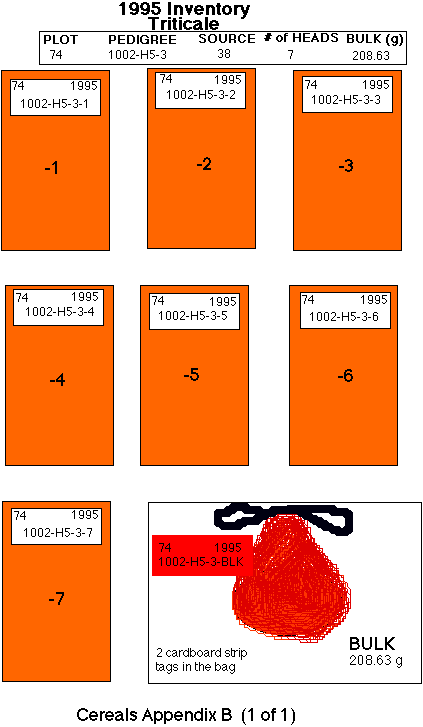
- There are two possible formats for the Headrow Inventory. In one format (NOTEBOOK), there is an inventory of the number of heads collected from each plot and a weight in grams of a bulk collected from each headrow plot.
Also, see the Notebook data at the top of the page for plot 74 in

In the second format (LABEL), the seed of each single head collected from a particular plot is assigned a unique pedigree and there will be several rows of labels with the same plot# and year but with different pedigrees.(see Label Format Inventory for Single Heads below)
")
")
For Headrow Bulk (Label Format) Inventory see "Label Format Inventory for Headrow Bulk seed" below and the labels on the envelopes in
")
")
")
This is the format of the inventory used to print out the labels for each envelope of seed. Labels were usually not created for the single heads, so making a seed pedigree inventory was not necessary but its existence made the spring work easier. If the LABEL inventory didn’t exist one had to make it for the seedlist next spring or eventually for the next year's notebook. This is explained later in the notes for creating the CEREAL INVENTORY.
If the Inventory is for labels, creating the seedlist involves only moving the previous year’s Plot number (Plot#) column to the right of the Pedigree column and renaming it as the XXXX (year) SOURCE column, deleting any spreadsheet rows/records that are not going to be planted and adding the new Plot numbers down the left side under a the heading of PLOT#.
The Headrow seedlist usually had only 3 columns: PLOT# or HEADROW#, PEDIGREE and SOURCE (See Appendix E). The SOURCE column contained the plot # of the seed for the SOURCE YEAR. If the new year was 1995, then it was understood that the SOURCE year was 1994. On the computer and even on the Seedlist there might be several more SOURCE columns with the year as the column header and the word Source on a line above. Usually, however, only the previous year’s seed was planted. If there are 2 or more SOURCE YEAR columns to the right of the PEDIGREE column, the most recent column is usually all you need to print but if seed is needed from an earlier year, you might need to print 2 or more of the columns. If you need to use seed from two or more years previous, consider changing the number of columns printed only for the few needed pages rather than printing out 2 or more SOURCE YEAR columns for every row. You can do this by hiding the columns not needed by reducing their column width to zero. When you need to print the information in that column, increase the column width to what is needed, adjust other column widths to accommodate the new column and print out the page(s) with the extra column.
The existence of the seedlist usually just made making the Notebook easier. The Headrow Seedlist for Triticale was usually followed by a few empty spreadsheet rows and then the Barley Headrow Seedlist. Be prepared for changing the seedlist order regarding Triticale and Barley. If the Seedlist was created with Triticale first followed by Barley, and in the field it's decided to change to Barley followed by Triticale or to add material to the second crop type, the Headrow#'s will have to be altered to reflect the change. One way around this is to assign separate blocks of numbers separated by 500 or 1000 to the Cereals. E.g. Triticale Headrows 1-1000. Barley Headrows 2001-2999. It's moslty just an inconvenience that is easily corrected back at the office so that the Notebook is correct. The usual number of Barley and Triticale headrows planted was around 600 each.
All print-outs are to be printed on one side of a page only. This is to make it simple to find information when pages are lying on a desk.
The headrow seedlist was printed out on 8.5 in. x 11 in. paper in a portrait format. It should be very easy to read. Make letters a bit larger than normal with extra spacing between lines. Make sure letters are dark, but BOLD is not really necessary. Notebook style lines are not necessary but there should be good spacing between each line of data. A ruler or a blank piece of paper can be used to keep one looking properly straight across the page. Perforated or dotted lines might help in keeping one’s eyes going across the page from Source column to Pedigree column and new Plot# column. Usually,the cereals were planted using the Inventory envelopes rather than making up new envelopes. The new Plot‘s were just written on the old envelopes and the old plot numbers were stroked out to indicate they were not to be used.Seed stayed in the old envelope.
.JPG "Seedlist1996(allheads).JPG (131 KB)")
.JPG "Seedlist1996(twoheads).JPG (104 KB)")
Observation Rows[]
- There were only a dozen or so Observation rows of Barley and Triticale planted each year. The breeder will select what to grow from the Inventory list of headrow bulks.The weight of seed available for each bulk should be listed so that the breeder can make decisions regarding how long the rows will be and if there is enough seed available for planting. Usually the Observation row seedlist was tacked onto the end of the Triticale and Barley Headrow Seedlist. The only difference from the headrows was that the amounts were larger and the pedigree ended with “-BLK” for BULK. The observation rows were planted from bulks of Headrow plots collected in the previous year. An observation row was used to increase the amount of seed of a variety for Yield Trials and was between 30 feet and 100 feet long.
- The Observation rows are grown from the bulks of the previous year’s headrows. So the first thing needed is the previous year’s inventory of the headrow bulks (See Appendix D). Be prepared to sort the inventory by amounts. The Breeder may want an idea of the available amounts for deciding how long the observation rows will be. You may even be asked to pull all of the bulk seed out of the seedroom. The bulk seed was usually in small red or orange mesh bags in small cardboard trays. Each bag had two tags in it with the year the seed was harvested, plot# and pedigree.The Breeder or yourself will mark the inventory indicating what is to be grown and what is not to be grown. The Breeder may also indicate a preferred order of planting for the observation rows.
- The format and construction of the Observation Row Seedlist is the same as for the headrows.
- Copy the Inventory.
- Rename the copied file as a SEEDLIST.
- Create a header stating that the list is the XXXX (year) (croptype) OBSERVATION ROW SEEDLIST.
- Insert a new column to the right of the PEDIGREE column.
- Move the PLOT# data to the right of the pedigree information and label the new column as a SOURCE column for a particular year.
- Put all of the inventory records in the proper order as decided by the Breeder and then
- Add the plot numbers to the left hand side.(In Excel, use the Fill Handle and the autofill feature)
Yield Trials and Germplasm Blocks[]
- The bulks to be planted for the Yield Trials and the Germplasm blocks were taken from the seed room and used to create a seedlist from the previous year's inventory.It’s possible that some bulks of headrow families of the same family as the Germplasm will be added to a germplasm block.
- The breeder needs to know the amount of seed available for each variety. She may even want them sorted by amount so that a decision can be made regarding a weight cutoff for what will be planted based on the planned size for Yield Trial plots. Some material may be sent out to other companies or researchers for testing. Keep track of these varieties and where they are sent. Mark the envelopes or bags of seed from which seed is being sent abroad so that the original envelopes of seed and their contents are not thrown out if housecleaning of the seedroom is done.
Seed Preparation[]
Headrows[]
- The person making up the seed in the workroom is going to have a tray of the previous year’s HEADROW seed in envelopes in front of her and the new year’s Seedlist of what is to be planted. Each envelope from the previous year is marked with a year and a plot number near the top in each corner (these are the SOURCE YEAR and SOURCE PLOT NUMBER).If there is no label on the envelopes, the pedigree data will consist of a dash and a single number written near the middle of the envelope and probably put on with a black permanent ink marker (See the envelopes in Appendix B). The number near the middle of the envelope is not a negative number. The dash indicates a continuation of a pedigree. The full pedigree is not written. The number after the dash gives the number of the single head that the seed came from.
- To begin, the person starts at the first Seedlist PLOT number (PLOT#) and looks at the SOURCE column plot number on the same line of the Seedlist. E.g 1996 Seedlist, PLOT#: 1, SOURCE 1995: 74. Then the person finds the set of envelopes in the old tray of the SOURCE year’s seed with YEAR and PLOT numbers that match the Source year and the SOURCE plot number on the Seedlist. E.g. If 1996 Seedlist says SOURCE 1995: 74, then find envelopes marked with the year of 1995 and with Plot# 74. There may be more than one such envelope. If the SOURCE column on the Seedlist doesn’t show the year, it‘s assumed that the SOURCE year is the previous year.
- Then the person checks the PEDIGREE on the new Seedlist and if the SOURCE plot number , SOURCE year and the pedigree on the old envelope matches the seedlist information, the matching envelope is marked with the new plot# as assigned by the Seedlist and the old plot# is stroked out. Finally, the person puts that envelope in a new seed tray in proper Seedlist assigned plot number order, ready for planting.
- If there are very few changes, the person might just go through the old seed tray removing anything not listed on the seedlist and making sure the envelopes are properly matched with the seedlist, marked with a new plot# and in the proper order as per the seedlist.
- It might be a better idea to switch the Plot# column with the Source column on the seedlist as it matches the flow of the work better, but that involves a change in procedure that might cause problems if someone forgets about the new change in procedure.
- Corrections might be made to the printed Seedlist in pen and material added. These changes must be entered into the computer as soon as the work with the seedlist is done so that the computer version matches the revised printed version.
- The seedlist and a small field notebook should be taken to the field. The seedlist was usually not consulted in the field for the headrows but the fieldnotes were needed when staking the plots. The seedlist was not consulted because the material was planted in plot number sequence. The field notes recorded at least what was planted at the start and end of each marked row. If there were gaps of more than a foot in the headrows, it caused a problem for staking even when you knew the exact number of plots in that row. Knowing the count did help, as did knowing where pedigree family changes occurred since usually family changes involved a plant heighth change.
Observation Rows[]
- Use the OBSERVATION ROW SEEDLIST for that year to put the bulk bags in order in one or more large cardboard trays. You might have 2 or 3 columns of bags per tray and 2 or 3 trays with bags.
Yield Trials and Germplasm Blocks[]
- Seed preparation for the Yield Trials and Germplasm blocks is the same as for the Observation Rows but using the YIELD TRIAL SEEDLIST and GERMPLASM SEEDLIST.
Some drawings or pictures[]
- Upload a picture or drawing of a pile of numbered #2 envelopes.(My picture is a drawing in .bmp format.)
- An isometric drawing of an empty brown corrugated cardboard seed tray containing 10 smooth white cardboard insert trays and a drawing of one insert tray.(My drawing is in .bmp format)
- A photograph of the seed tray holding envelopes would be nice.
Planting[]
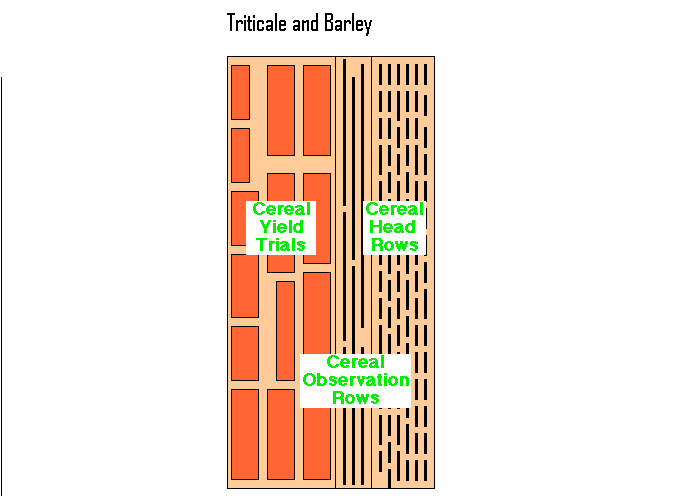

The Triticale and Barley fields
Headrows[]
- The seed bed was prepared before planting and should not be made too powdery. The fewer times over the field the better. The rows for the headrows and observation rows were marked with an empty 4 row, 30” corn planter. When the headrows were planted, the tractor wheels made the soil powdery and this lead to the soil in the wheel tracks blowing away. The Headrows were planted in the rows marked by the corn planter in a serpentine fashion. Be very careful not to skip a row at the end of the field when turning around to start the next row.
- The headrows were planted with a home-made belt seeder constructed from parts of an old 2 row corn planter. It has a belt made from an old tire tube that lies flat from the front to the back like a horizontal conveyor belt. The belt is geared to the wide press wheel at the back of the unit. At the front of the unit is a tube between two opener disks. The unit is attached to the tractor by a three point hitch. Seed is spread from the front of the belt to a metal divider piece that indicates the end. Attached to the press wheel is a rope of about 6 or 7 feet with a metal rod with a 90 degree bend for a handle near the top. When the unit is set down at the start of a row, the metal rod is placed beside the press wheel.
- Have the large cardboard tray containing the white trays with the seed packets at one end of the field. Give the tractor driver 2 or 3 white trays and make sure the packets are numbered in order and that the driver can see the numbers and will give them out in numerical sequence. The first packet is given to the planter who checks the numerical order of the planting number and then spreads the seed out evenly in a line on the belt. The empty packet is placed inside a large empty orange mesh bag hanging from the back of the tractor. The driver moves ahead. Just before the rope attached to the metal rod becomes taut, the planter yells "Whoa!" or "Stop!". This plants the seed in about 5 feet. There will be a gap of one or two feet that is empty. There was usually about a thousand headrows. The metal rod is pulled out and placed beside the press wheel again. Unnumbered stakes were used to indicate where each headrow began. These stakes were placed beside the opener disks.
- The planter should record the planting number and pedigree/Source details for the first or last headrow planted in a row. This allows the planter to check the number of headrows in a row after the seed sprouts. Most of the Headrows sprout as 5 foot lines of green but sometimes the seed does not sprout or there is a gap in the placement of seed that makes it difficult to be sure how many headrows there are and where they start and stop. The stakes are supposed to help with this. The headrows are planted in a serpentine fashion up one row and down the next.
- This method of planting the Headrows is very hard on the tractor's clutch because of all the starting and stopping.
Observation Rows[]
- The observation rows were planted with a modified single row unit from a 2 row corn planter. It had a tube between disk openers,a press wheel, a grain wheel over the tube from an old cereal drill geared to the press wheel by a chain and a funnel to hold grain above the grain wheel. The unit was attached to the tractor by a three way hitch.
- To plant the seed, grain was poured into the funnel and the driver then drove ahead for the desired distance. Then the grain was removed and the unit was raised off the ground so the press wheel could be turned and all seed removed from the unit by the drill wheel. Excess seed was returned to the envelope or mesh bag it came from.
- Stakes were placed at the beginning of each Observation row. The rows were planted in a serpentine fashion along the rows made by the empty corn planter.
Yield Trials and Germplasm Blocks[]
- A small 8 foot drill was purchased for planting the Cereal Yield Trials and Germplasm blocks. The size of the Yield Trial Plots was around 30 feet long and about 6 feet wide. The plots were basically as long as the amount of seed would permit so there were no neat alleyways with plots starting and stopping at the same place.
- Prior to planting, a shop vacuum and a generator were rented and attached to the back of the drill. Three or four drill wheel slots on each side of the drill were blocked off with duct tape. A box containing the bulks to be planted was placed on top of the drill where the fertilizer would go. Fertilizer was not applied with the seed.
- The seedlist was used to order the bulks in the box and to select the bulk of seed to be planted as the seeding progressed.
- Seed was placed in the drill and spread evenly between the drill wheel slots. If there was lots of seed this was not a problem. If there was only a little bit of seed, each wheel slot needed to have about the same amount of seed. For the yield trials, an amount was assigned below which a bulk would not be selected. For the germplasm plots though, small bulks required reducing the number of centered drill wheel slots filled with grain to make a plot that was not as wide as usual.
- The person on the back of the drill made sure all the drill wheel slots had about an even amount of seed and that the seed was going down the drill. Near the end of the seed supply, a flat wooden stake with a pointed end was used to push seed into a drill wheel and to keep the amount of seed in each slot even. If the seed ran out the driver was told to stop.
- Any excess seed that could be scooped out of the drill was put back into the envelope or mesh bag it came from together with any tags for the variety pedigree etc.
- Then the shop vacuum was used to remove excess seed and to remove any seed in the drill wheel slots. The drill wheels were rotated by hand from one side of the drill during this and every attempt was made to clean out the drill wheel wells.
- Unmarked stakes were placed at the start of each plot front and center. Then a gap of about three feet was left and the next plot of seed was placed in the drill and was planted.
Staking the Plots[]
- When all the Cereals have sprouted and are visible, the numbered stakes can be placed. The Headrows can be the most confusing to stake especially if there are headrows with gaps. A numbered stake should be placed every 5 or 10 plots. Every 5 plots would be very nice but every 10 is o.k.. The stake is placed at the front of the headrow. The unnumbered stake should be removed and kept for use next year.
- The field notebook should state at what end of the field planting of the headrows started and what direction the headrows were planted in going down the field. Check that the last headrow of a row and the first headrow of the next row matches with notes taken at field time. Also watch out for any headrows, Observation rows and Yield trials or germplasm blocks that were planted near the end of a row and then continued in the next row. Avoid doing this if possible. Prior to heading, the plot#'s can be compared with pedigrees in the notebook based on the similar heights of related material and differences in height of different material.
- The Observation row plots are just very long Headrows and a numbered stake is placed at the front of every fifth or tenth observation row plot. It may be desirable to have the plot#s of all observation rows on one end so that one doesn't have to walk to the other end of the plot to see the plot # because of the serpentine nature of the planting.
- The Yield Trial and Germplasm plots are staked with numbered stakes placed front and center of each Yield Trial Plot.
- The Wooden Stakes
- The stakes are wooden and about 1/4 in. thick, 1 in. wide and between 8 in. and 12 in. long. The stakes have one pointed end. Stakes painted white are nice but not necessary. The plot numbers can be put on at the office using black permanent ink Sharpie markers. Test any new permanent marker to be used on stakes in the field before using it to mark plot numbers. Sharpie markers almost seem to create a tatoo in the wood so the numbers stay on after a lot of weathering.
- Each stake should be placed on an angle between 45 and 60 degrees and far enough ahead of the first plant of the plant row or plot that it is not going to interfere with the growth of that plant.A stake can be placed inside yield trial or germplasm plots in the first foot or so near the center.
- Lay the stakes out on a table with the pointed end on the right and the square end on the left and write the plot numbers on from left to right. For the Barley and Triticale you should write plot numbers for the end plots of each headland and plots that are a multiple of 5 or 10. Bundle these stakes together and get them placed in the ground according to your field notes and planting plan.
Notebook-Cereals[]


- Landscape, 2 hole, pasteboard Notebook covers
- BROWN COVER
- TITLE: (YEAR) CEREALS
- Days to pollen shed chart on inside back cover and on a page near the front of the book
- See the Sample Notebook page on the next page of these notes and any Cereal Notebooks from 1995-1999)
- Landscape pages (11 in. x 8.5 in. - 2 holes left side and large 1”-2” (?) margin on left side)
- Usual Notebook header: Year, Nursery name, Location, Date of planting
- There are several ways of putting in the page header but every page should have the header information on it. One can use 4 title locked spreadsheet rows or 2 page header rows and 2 title locked spreadsheet rows. The sample page from 1995 has a two row locked title spreadsheet header with only one spreadsheet row used for the column headings. You will note that the SOURCE column on the 1995 sample page has the word source rather than a year. It would be better to have the year although it is assumed it is the previous year (SOURCE 1994). Another thing to note about the 1995 sample page is that the skeleton system of showing the pedigree was used and there is no indication on the page of what precedes the pedigree part in plot 526. If the skeleton system is used, you want to make sure that a full pedigree appears at the top of the page so you don’t have to refer back a page or more.
- Usual columns for Cereal Headrows. Plot#, Pedigree, Source, Seed-Remarks, Colour, Leaf-Width, Plant -Height, Maturity, Days-to-Pollen shed (Head), Rating, blank columns, and REMARKS
- perforated lines preferable but thin solid lines o.k.
- 25 headrows/plots per page with Double underline, darker line or change in line thickness every 5th plot.
- Make sure the page margin is the proper size so that there are no plot numbers covered up by the center binding.
- A border on the right side of the page is not necessary and the right margin can be 0.
- Plant Height and days to Maturity were usually not recorded. A CIMMYT plant breeder might want these and even more trait columns.
- Ratings on leaf colour,leaf width and date of pollen shed (Days to Head) were made.
Sample Notebook Page[]
Pollinations-Barley and Triticale[]
- THIS WOULD BE BEST WITH LOTS OF GOOD ILLUSTRATIONS AND VIDEO
- There are several different methods for pollinating cereals. "HYBRIDIZATION OF CROP PLANTS” (1980) Editors: Walter R. Fehr and Henry H. Hadley (1980) shows how to pollinate Barley on pages 189-202 and how to pollinate Triticale on pages 681-694. Other companies have used methods involving sterile male lines and even bees.
- EQUIPMENT
- small scissors, tweezers or forceps, small glassine bags,paperclips, small tags with string. Magnifying eyeglasses are helpful as well.
- The object is to get pollen from the spike of one plant onto stigmas inside the florets of the spike of another plant that has had its anthers removed before they were mature enough to make pollen. Note that the word head will often be used in these notes and by others but the correct terminology is spike.
- General Procedure:
- 1) Trim spike (head isn’t the correct word to use) leaving about a dozen good florets
- 2) snip florets 1/4 way from top (can even snip at 1/2)
- 3) Remove anthers
- 4) Place glassine bag over spike
- 5) Fasten glassine bag to head using a paperclip (DON'T BRUISE STEM!)
- 6) Obtain pollinating spike of male of cross to be made
- 7) Prepare pollinating head by snipping 1/4 from top of florets
- 8) Pollinate female spike using male spike
- 9) Refasten glassine bag with paperclip and marked tag with string. Wrap string around plant
- Misc notes
- When to prepare the spike?
- Spike not visible but still hidden by leaf. Check maturity of anthers.
- Anthers should be green but never yellow. If yellow, it is probably too late. May possibly need to snip leaf off but try to avoid that if possible.
- Trimming spikes and emasculation
- I usually have a set of snipped florets on each side of the stem.
- Remove top, bottom and side florets leaving only large florets on two sides.
- Remove anthers very carefully. Do not damage the feathery stigma at the bottom of the floret (inside)
- Make sure no bits of anther inside floret
- Snipping the floret may snip anthers but this is o.k. Snipped anther should wither and die but to be safe, remove it.
- Don't rub anthers against the side - might break and pollinate stigma
- The paperclips don't work very well. Often they are too tight and bruise the stem.
- A better method is needed to keep the glassine bags attached to the head.
- The object of pollinations is to get pollen from the head of one plant onto the stimas inside the florets of an emasculated plant
- There are many different methods but only one is given here.I would like other methods here as well.
- Male Spike must have mature yellow anthers and may even be shedding some anthers
- 1. snip florets near top of florets
- 2. Place male spike upside down over (emasculated) female spike inside glassine bag and tap male spike so pollen falls onto female.
- A paper clip was used to secure the glassine bag to the female plant but it tended to bruise the stem so it wasn’t a good idea.
- A small merchandise tag with string was tied to the female plant and marked using a permanent ink marker with the male plot number on top separated by a line and the female plot number on the bottom. If the cross was written horizontally instead of vertically, the female plot number was written first followed by an “x” and then the male plot number was written. The tag can contain other information such as the date of pollination and the initials of the pollinator.
Illustration or video of steps in Pollination procedure
- I would like to have an illustration here showing steps in the emasculation and pollination.
- There is an excellent HOW-TO example of Pollination procedures for Tomatoes at
<a href="http://www.avrdc.org/LC/tomato/hybrid/08emasc.html" class="external free" rel="nofollow">http://www.avrdc.org/LC/tomato/hybrid/08emasc.html</a>
Check out the entire How-to for Hybrid Seed Production in Tomato
- <a href="http://www.avrdc.org/LC/tomato/hybrid/01title.html" class="external free" rel="nofollow">http://www.avrdc.org/LC/tomato/hybrid/01title.html</a>
Pictures and Illustrations of Spikes and plant parts[]
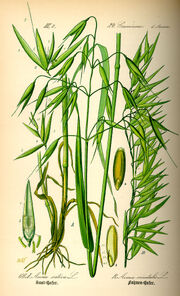
Triticale[]
Two-rowed Barley[]
Six-rowed Barley[]
Harvest[]
Headrows[]
- Select heads
- About half a dozen of the best heads from a headrow were collected and put in a small red mesh bag with a tag containing the Letters SH for single head and the Headrow#. The tag was written with a sharpie marker on a heavy cardboard strip at the time of selection.
- Usually 4 heads were collected from a headrow but for some really good headrows,a dozen heads were collected and for some poor headrows, 0-3 heads were taken.
- Headrow Bulks
- A bulk was taken of the plot using large snippers that people use to trim grass around buildings with. A handful was collected together and held near the base of the heads and then a second person cut the stems below the person's hand. The entire Headrow was cut in this way and placed in a medium sized mesh bag with a tag containing the letters BLK for Bulk and the Headrow#. E.g. BLK 703.Be very careful when cutting.
- A better way might be to use a sickle in one hand and grab plants with the other.
- A bulk was collected from most but not all of the plots.
- Family Bulks
- Sometimes single heads would be collected from several headrow plots of the same family and tagged as a Bulk of Headrows X-Y. E.g. HR BLK 703-712
Observation Row Bulks[]
- The Observation rows were cut and bagged in large mesh bags. All of the Observation row was cut for each variety.
- Mention of the use of sickles, scythes and implements that cut and bind small grains could be added here.
Germplasm Bulks[]
- The best heads of a Germplasm plot were selected and placed in a medium size mesh bag until it was full. A tag was added with the plot# and family pedigree of the germplasm. E.g. 908 RG1200
Yield Trial Bulks[]
- One or two areas of the same size were cut from each plot and put into large mesh bags with tags containing the letters YT,the Plot# and the number of bags. E.g. YT 501 1 of 4.
Threshing[]
- (For discussion section)
This section might be put in the HARVEST section or possibly the INVENTORY section as there are notes taken at the time of threshing
Single heads[]
Number 2 coin envelope marked with sharpie marker with Headrow#,year, and dash head# (-n). # of heads recorded in Notebook.[]
- Threshed by hand rubbing. Use of vacuum and special screened cup to remove chaff. Placement of seed in #2 coin envelope.
Headrow, Observation Rows and Germplasm Bulks[]
- Threshed using home-made thresher powered by electricity.
- Cleaned seed placed in #6 Coin envelope, mesh bag, plastic burlap bag or pail depending on amount.
- The Weight of seed was recorded in the Notebook or on a printed inventory list.
Yield Trial Bulks[]
- Threshed with home-made thresher and cleaned with blower.
- The total amount of seed was weighed and recorded.
Winnowing Fan[]
- A rectangular wooden box with a small electrical rotary blower at one end. A V at the top with one side of the V slidable allowing seed to flow down through middle of box. Seed was caught beneath after passing through the airstream. Light seed and chaff was blown out. The airflow was adjustable. Cleaned seed was put in small to medium sized mesh bags with cardboard tags with the plot number written on it with a permanent ink marker:
- A note on the Chinese winnowing fan could be added here.
- Pictures of portable vertical threshers used by researchers and the home-made blower could be added here.
Inventory and Labels[]
Headrows[]
- Year and Nursery name on first line
- Plot, Pedigree, Source(previous year),#of heads, BULK (g)
- In 1995 most headrow bulks were around 300 g.
- Labels - Not created but list for labels kept as Inventory of single head seed pedigrees.
- Updating pedigrees same as for inbred maize. If four heads of RG1200-5-2 collected then pedigrees are:
- RG1200-5-2-1
- RG1200-5-2-2
- RG1200-5-2-3
- RG1200-5-2-4
- Pedigree of bulk seed recorded as RG1200-5-2-BLK
- Pedigree of family bulk from headrows 300 to 350 recorded as RG1200-BLK or possibly as just RG1200 with the Source plot #'s for that year of Plot#'s 300-350.
- The method used to create the Cereals Notebook Inventory and the Label Inventory formats is the same as used for the Maize Inbreeding Nursery.
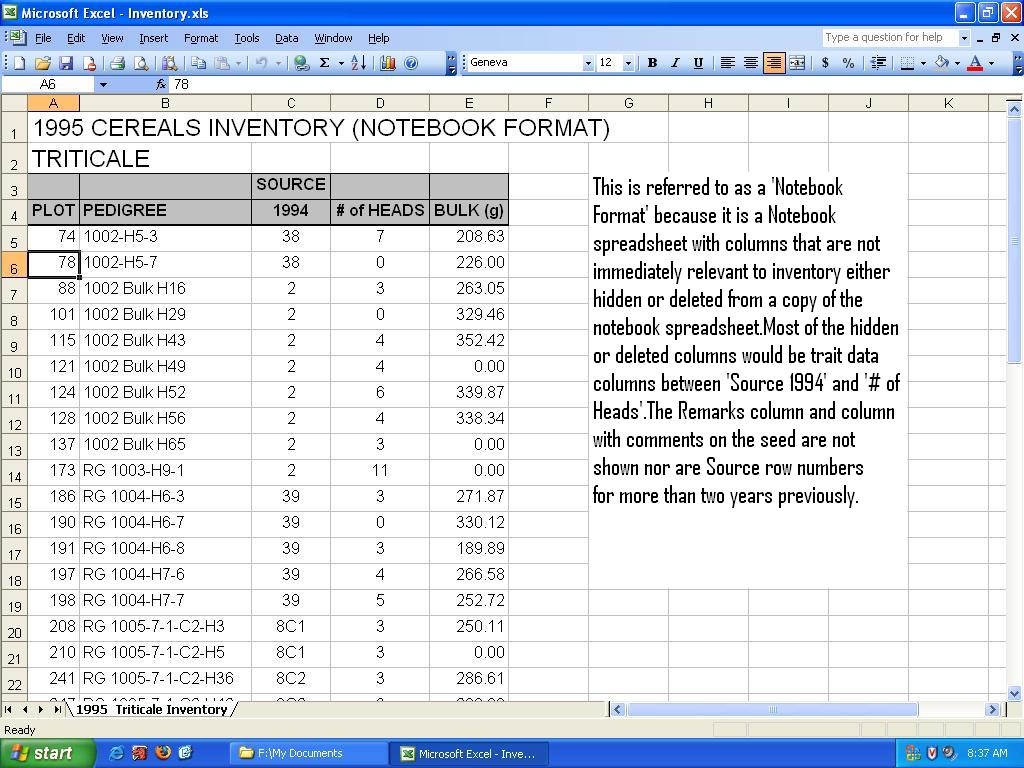

Triticale Notebook format Inventory
A. Update the Notebook[]
- 1. Check the Notebook page by page for any changes made in pen to the printed Notebook and get these changes entered into the computer so that the computer version of the Notebook matches the revised Notebook.
- 2. Prepare and set up the printed Notebook for data entry. I fill in empty cells in the printed Notebook with zeros so that I can enter data into the computer straight down the page. This is to help keep the data entry aligned with the Notebook.Also use a blank piece of paper to guide one’s eyes and expose one number at a time.
- Prepare the computer for data entry if necessary. With the old VP-Planner spreadsheet I removed cells containing lines using a sort by plot number.I then deleted all the cells with lines that were now together as a result of the sort. I also created macros for entering and listing the data to avoid having to enter a “cursor down” keystroke after every entry. With EXCEL 97 none of this was necessary as lines were not in spreadsheet cells and the cursor could be set to automatically move down to the next cell after a number was entered and the return key was pressed.
- 3. Enter into the computer Notebook pages the data regarding the number of heads collected from each headrow plot going straight down the printed Notebook page. Make sure that the data for a page is going in the right place and is not misaligned.Check that the computer entry matches the printed Notebook entries after each page.Save your work to the hard drive or a floppy every few pages.
- 4. Return to the start of the printed Notebook and the computer Notebook and enter the bulk weights for each headrow plot going straight down the pages.
- 5. Enter the yield data for the Cereal Yield trials into the computer version of the Notebook.
- 6. Save copies of the completed updated Notebook to your hardrive and a backup floppy or CD.
- 7. If there is other data in the printed notebook that you want in the computer, do the label inventory first and enter the other data later.Normally, the data that was collected for each plot wasn’t entered into the computer but just into the printed Notebook. It would be nice to have it available in the computer.
- 8. You may want to create a separate version of the Notebook data showing only the Inventory data such as PLOT#,PEDIGREE,SOURCE(s), NUMBER of HEADS,and Bulk(g). You could hide or delete the columns you don’t want for the Inventory, change the title to something like “1995 Inventory – Triticale” and save or print out this list as an Inventory.
B. Create Label Inventory[]
- 1. Save a copy of the updated computer Notebook pages to a renamed spreadsheet or workbook with the words “label” or “Inventory” in it. Close the updated computer Notebook spreadsheet or workbook.
- 2. Change the computer Notebook title lines to a title containing the YEAR, “INVENTORY” and the cereal crop type such as Triticale or Barley. E.g. 1995 INVENTORY- TRITICALE.
- 3. Show all spreadsheet columns and make sure there are no hidden columns.
- 4. Delete all of the columns except those that will be retained for the Inventory such as PLOT#,PEDIGREE,SOURCE(s), NUMBER of HEADS and Bulk (g).
- 5. Save this spreadsheet as a NOTEBOOK format INVENTORY. You will need it to create the labels for the bulk headrow, observation rows, and germplasm seed.
C. Create Single Head Labels[]
- 6. Delete the Source and Bulk columns so you just have PLOT#, Pedigree and number of heads.
- 7. You are going to create a spreadsheet row for each head collected and update the pedigrees so that there is a unique pedigree for each head. I used macros for this in both VP-Planner and Excel but I ran into problems using Excel.
- 8. First create a pedigree that adds “-1” to each pedigree on the spreadsheet. This is the pedigree of the first head collected from each plot. Manually, this can be done by entering each pedigree cell and typing “-1” onto the end of each pedigree. I created circular macros with VP-Planner that would only stop when I hit the break key. I would have liked to have created macros that stopped when they encountered an empty cell. The macro started at the first pedigree cell, entered the cell and added “-1” to the pedigree and entered that as the new cell contents. Then the macro moved down to the next pedigree and repeated the cycle. I had a problem trying to create this circular type of macro in Excel because it involved using relative cell addresses. I’m quite sure that using Visual basic it is possible to do but I still don’t know how to do it without using Visual Basic. Instead, when using Excel, I inserted a new column after the pedigree column and entered “-1” into a cell a few rows above the new column. Then I set things up to use the concatenate function, the pedigree column and the cell containing “-1” to put into the new column, all at once, the new pedigrees with “-1” attached to the right ends. Then I deleted the old pedigree column and renamed the new column the pedigree column.
- 9. With VP-Planner I made extensive use of macros for the next part but due to the problem with relative addressing in EXCEL, I had to revert to VP-Planner. Luckily, I had a 3.25 in. floppy copy that I made as a backup for the 80286 that I had acess to two years earlier. The original was a 5.25 in. floppy and the Pentium didn’t have 5.25 in. drives. At the time I was using the Pentium and Excel, I did not have access to the 80286 anymore and could not use 3.5 in. floppies on the 8088 which had two 5.25 in. floppy drives. I had specifically made a point to purchase EXCEL even though MS-Works was provided free because Excel had macros and I found that Excel would run the LOTUS 1-2-3 type macros created by VP-Planner. Excel just wouldn’t run the macros with relative addressing that were actually the most important. This is one of the major flaws of the spreadsheet method and trying to upgrade it. I will discuss it in a later section.
- 10. Create a macro or a set of macros that do the following:
- a. Begin in the “number of heads” column and read the number in that cell.(E.g.
- 2).
- Assign the value of that number (2) to a variable called n.
- If the number is 1 or 0, move the cursor down one row and start again. You already have a pedigree for 1 head and if no heads were collected you don’t need a label. It’s best actually to sort the records with 0 heads out of the list before starting.
- b. Now, if the “number of heads” number is >1, you want to insert n-1 (2-1=1) new spreadsheet rows but you want to make sure to do it in a way that all of the data in every column moves down. This might require moving to the first column and selecting from the upper left to the lower right of the number of rows you want to insert. The old ClarisWorks spreadsheet program I have access to at the moment moves data from only a single column down unless I select across the columns but I think EXCEL was o.k. if you just selected rows in one column.
- c. After creating the new spreadsheet rows, move up to the “number of heads” number and across to the PLOT# column. Select the PLOT# and PEDIGREE cells and copy the plot# and pedigree data and paste it into the new empty rows.
- d. Move the cursor to the pedigree column, to the cell in that column that is one row below the number of heads number. Enter the cell, delete the 1, and add “2” to the right end of the pedigree.
- f. Repeat this process, increasing the number by one each time until the number added to the right end of the pedigree equals the “number of heads” number.
- g. Move the cursor straight across to the “number of heads” column and then move it down one row to the next “number of heads” number. This is all a slight variation of the Jacoby Decimal genealogy system.
- h. Repeat the cycle for the new “number of heads” number.
- With VP-Planner I hadn’t figured out how to get it to read the value of the number in the cell but there did seem to be a function listed in the documentation I had that seemed to do that. I read the number myself and assigned the homerow keys from A to about H, to a half dozen macros that inserted the rows, copied the data into the new rows, changed the pedigrees and moved to the next “number of heads” number ready to go again. If the “number of heads” number was 1, I pressed A. If the”number of heads” number was 2, I pressed S and so on for up to about 5 or 6. I put pieces of masking tape with a number on them on each assigned key. Then I just looked at the highlighted number and pressed the appropriate key. For numbers higher than 5 or 6 (which was rare) I found it easiest to use the highest number macro and then another macro that added up to near the number .Then I manually inserted the pedigree right end numbers from the second macro I used to the “number of heads”. If I made a few extra rows I deleted them and if I was short a few rows I added them and finished off the work of making the pedigrees for the heads collected from that plot.
- If I could have figured out how to get VP-Planner to read the cell contents, I could have automated the whole process.
- In Microsft EXCEL,I couldn't use my circular dynamic editing macros and use of Visual Basic for Applications (VBA) seems necessary.
Update 2006
- I have a small Excel macro now that automates the entire process. It is not the best programming but will do the job. I'm sure someone must have a similar and better programmed macro.The program is similar to what one needs to print out a computer directory structure.The required columns of data are brought into a spreadsheet and the macro goes down the column with the number of heads, cobs or plants, and creates the information for the new records on a new spreadsheet or a few columns to the right.
- Of course, one would be a lot better off to get software like Agrobase, ICIS, MSTAT,PRISM etc. that will create the new records with one button press.
- Example using 1995 CEREALS (Notebook format) INVENTORY-Triticale
| C1 | C2 | C3 | |
|---|---|---|---|
| R1 | PLOT | PEDIGREE | # of HEADS |
| R2 | 74 | 1002-H5-3 | 7 |
| R3 | 78 | 1002-H5-7 | 0 |
| R4 | 88 | 1002 Bulk H16 | 3 |
- I have labeled the columns C1 to C3 and the rows R1 to R4.
- First: Add “-1” to all of the pedigrees.
| C1 | C2 | C3 | |
|---|---|---|---|
| R1 | PLOT | PEDIGREE | # of HEADS |
| R2 | 74 | 1002-H5-3-1 | 7 |
| R3 | 78 | 1002-H5-7-1 | 0 |
| R4 | 88 | 1002 Bulk H16-1 | 3 |
- Go to (C3,R2). The number is 7 so add 7-1= 6 new rows. The reason for subtracting 1 is because the original spreadsheet row is used for “-1” (the first head).
| C1 | C2 | C3 | |
|---|---|---|---|
| R1 | PLOT | PEDIGREE | # of HEADS |
| R2 | 74 | 1002-H5-3-1 | 7 |
| R3 | |||
| R4 | |||
| R5 | |||
| R6 | |||
| R7 | |||
| R8 | |||
| R9 | 78 | 1002-H5-7-1 | 0 |
| R10 | 88 | 1002 Bulk H16-1 | 3 |
- Copy the PLOT# and PEDIGREE data into the new rows.
| C1 | C2 | C3 | |
|---|---|---|---|
| R1 | PLOT | PEDIGREE | # of HEADS |
| R2 | 74 | 1002-H5-3-1 | 7 |
| R3 | 74 | 1002-H5-3-1 | |
| R4 | 74 | 1002-H5-3-1 | |
| R5 | 74 | 1002-H5-3-1 | |
| R6 | 74 | 1002-H5-3-1 | |
| R7 | 74 | 1002-H5-3-1 | |
| R8 | 74 | 1002-H5-3-1 | |
| R9 | 78 | 1002-H5-7-1 | 0 |
| R10 | 88 | 1002 Bulk H16-1 | 3 |
- Enter the Pedigree cell of the first new row (C2,R3) and change the rightmost “1” to a “2”.
| C1 | C2 | C3 | |
|---|---|---|---|
| R1 | PLOT | PEDIGREE | # of HEADS |
| R2 | 74 | 1002-H5-3-1 | 7 |
| R3 | 74 | 1002-H5-3-2 | |
| R4 | 74 | 1002-H5-3-1 | |
| R5 | 74 | 1002-H5-3-1 | |
| R6 | 74 | 1002-H5-3-1 | |
| R7 | 74 | 1002-H5-3-1 | |
| R8 | 74 | 1002-H5-3-1 | |
| R9 | 78 | 1002-H5-7-1 | 0 |
| R10 | 88 | 1002 Bulk H16-1 | 3 |
- Continue changing the pedigrees in the new rows until there is a new pedigree for all 7 heads.
| C1 | C2 | C3 | |
|---|---|---|---|
| R1 | PLOT | PEDIGREE | # of HEADS |
| R2 | 74 | 1002-H5-3-1 | 7 |
| R3 | 74 | 1002-H5-3-2 | |
| R4 | 74 | 1002-H5-3-3 | |
| R5 | 74 | 1002-H5-3-4 | |
| R6 | 74 | 1002-H5-3-5 | |
| R7 | 74 | 1002-H5-3-6 | |
| R8 | 74 | 1002-H5-3-7 | |
| R9 | 78 | 1002-H5-7-1 | 0 |
| R10 | 88 | 1002 Bulk H16-1 | 3 |
- Go to (C3, R9). It is 0, so you don’t need a label, so move down to the next number at (C3, R10). The number is 3. Run the Macro for 3 or create the new pedigrees for each head manually so it looks like this:
| C1 | C2 | C3 | |
|---|---|---|---|
| R1 | PLOT | PEDIGREE | # of HEADS |
| R2 | 74 | 1002-H5-3-1 | 7 |
| R3 | 74 | 1002-H5-3-2 | |
| R4 | 74 | 1002-H5-3-3 | |
| R5 | 74 | 1002-H5-3-4 | |
| R6 | 74 | 1002-H5-3-5 | |
| R7 | 74 | 1002-H5-3-6 | |
| R8 | 74 | 1002-H5-3-7 | |
| R9 | 78 | 1002-H5-7-1 | 0 |
| R10 | 88 | 1002 Bulk H16-1 | 3 |
| R11 | 88 | 1002 Bulk H16-2 | |
| R12 | 88 | 1002 Bulk H16-3 |
- When you are finished creating all of the new pedigrees, you can delete the “number of heads” column because you no longer need it. Now you can save the data as a database file (.dbf) and use the database file and a label wizard to print out the labels.
PRINT OUT THE LABELS
- Use a label Wizard (MS-Access), Envelopes and Labels menu choice (MS-Works) or a print macro (VP-Planner) to print labels for all of the rows/records.
- With VP-Planner, I used macros to print out the labels from the spreadsheet after I added the year in a new column.
#2 Coin Envelopes
- If #2 envelopes are used, The label should have the plot# on the upper left, the pedigree centred and about one or two lines down and the four digit year number on the bottom left of the label.
#6 Coin Envelopes
- If the label is for a #6 envelope or larger,it should have the plot# on the upper left, a four digit YEAR number on the upper right, and the pedigree centred and about 2 or three lines down.This was done by dropping fields in a label box using the MS-Works label wizard.

Excel Macro[]


Note: Column G header should be PLOT not ROW. To be corrected.
The Excel VBA listing below is a crude VBA program along the lines of what is needed to create single head labels.It needs lots of improvement.
This macro works on Columns A-D and prints out the required new records in columns G-I.The macro takes a value from the field/column containing the inventory amounts (such as the number of single heads of Triticale collected) and creates the new records for each single head.
Columns A-D contain the identification information which one might pull in from a database file.
Another version of the completed macro would work on a copy of a notebook spreadsheet.The macro would find the relevant fields/columns and create the new records on a new spreadsheet or a few columns to the right.
The range selection isn't proper yet and one should select all of columns A-D for it to work properly.The use of arrays would be much better as well.
- Cereals New Records Excel macro
- Option Explicit
- Sub LabelList()
- Dim MyRange As Range
- Dim QTY As Integer
- Dim rnganchor As Integer
- Dim row As Integer
- Dim Cell As Range
- Set MyRange = Application.InputBox _
- (Prompt:="Select the INPUT range", Title:="SELECT INPUT RANGE", Type:=8)
- MyRange.Select
- 'USE $A$2:$D$48 as the INPUT RANGE
- rnganchor = 2
- 'MsgBox ("Range Anchor is: " & rnganchor)
- Range("D2").Select
- For Each Cell In MyRange
- QTY = ActiveCell.Value
- For row = rnganchor To rnganchor + QTY - 1
- QTY = ActiveCell.Value
- ActiveCell.Offset(0, -3).Range("A1").Copy Destination:=Range(Cells(rnganchor, 7), Cells(rnganchor + QTY - 1, 7))
- Application.CutCopyMode = False
- ActiveCell.Offset(0, -1).Range("A1").Copy Destination:=Range(Cells(rnganchor, 9), Cells(rnganchor + QTY - 1, 9))
- Application.CutCopyMode = False
- Cells(row, 8).Value = Cells(ActiveCell.row, ActiveCell.Column - 2).Value & "-" & row - (rnganchor - 1)
- Next row
- rnganchor = rnganchor + QTY
- ActiveCell.Offset(1, 0).Select
- 'MsgBox ("Range Anchor is: " & rnganchor)
- Next Cell
- Worksheets("NextGeneration").Columns("H:K").AutoFit
- Range("A2").Select
- End Sub
- Private Sub CommandButton1_Click()
- End Sub
- Sub Button5_Click()
- Range("G2:I156").Select
- Range("G2:I156").Clear
- Range("A2").Select
- End Sub
When the INPUT box appears, Select the range A2:D48 by Clicking on A2 and dragging the pointer to the bottom right corner of the INPUT range at D48.This will appear as the range $A$2:SD$48 in the input box The idea is to allow the INPUT range to have various lengths so one could cut and paste the INPUT range into the worksheet from another worksheet or pull the required fields in from an external database file. The procedure allows selection of one cell or one column etc. so it doesn't work correctly for such selections. Note the ERASE INPUT range is set to G2:I156. If the output exceeds that range, it won't be erased. Just erase it manually.
Cursor is programmed to begin at D2 (Row 2,Column 4)so there is no need to position it before starting the macro
Note: The No. of Heads range is currently set to Column D.This will be changed later to a dynamic named range.
EXTENT OF NEXT RANGE
- Rows change
- Columns are absolute
Improvement Plans
- Use AutoFill or FillDown for Row,Family and SourceYear Row Number
- Use named dynamic ranges
- Use named dynamic arrays to increase speed
- Use Application.ScreenUpdating = False to increase speed for long lists
- Add Error Handling
- Pull recordset from database file
- Save NextGeneration Output as Excel database file, .dbf file or .mdb file
- Add colour?
- Create as an Excel Add-in
- Create NextGeneration as an Access Macro
Picture showing line from Notebook and labeled envelopes and bulk in mesh bag[]
Headrow Bulks[]
Get your Headrow Inventory (Notebook format). Keep the PLOT, PEDIGREE, SOURCE(s) and BULK (g) columns. Delete the # of heads column and instead of adding “-1” to all the pedigrees, add “-BLK”. You don’t have to insert any rows but you might want to group plots with no bulk together near the end of the list as you don’t need labels for them but you might want to know which plots they were.
Then save the spreadsheet or a database form of it that contains at least the plot #, new pedigree previous year(s) SOURCE(s) and the bulk amount. Give a BULK INVENTORY title. You probably won’t need to print out the bulk labels but now the data is ready for use in the spring.
Germplasm[]
- The Pedigree is not changed. Include amounts in the Notebook and record in the cereals inventory. The labels will have the plot#, year and the pedigree of the germplasm family. Put two labels in each mesh or plastic burlap bag.
Yield Trials[]
- Enter all of the data regarding plot yields and any other desired information to the computer. Create a summary showing the plot numbers, pedigrees and yields of each plot. If there is more than one plot of a variety, group the plots by variety name/entry number and put in a line showing averages for the data.
Pedigree Notation[]
- There should be a section here on how to write pedigrees using the Purdy notation system.
- Cite Purdy, L.H. CROP SCIENCE, Vol. 8, July–August 1968, Pp. 405-406.
- I have a scan of the Purdy notation paper but it's probably a copyright violation to post the .pdf's here.
Seed Storage Envelopes Illustration[]
Cereals Appendices and bookmarks[]
Cereal Breeding Procedures by J.B. Harrington
- FAO Development Paper No. 8 (28??)
- FAO Dec. 1952
- Library of Congress: UN 9 FA 500 52 A18
Barley A few pictures of Barley spikes I want labeled pictures, however, for discussing aspects of pollination and other matters.
- http://en.wikipedia.org/wiki/Barley
- http://www.barleyworld.org/whatisbarley.php
- http://cropandsoil.oregonstate.edu/classes/css430/CIHEAM04/
- http://images.search.yahoo.com/search/images/view?back=http%3A%2F%2Fimages.search.yahoo.com%2Fsearch%2Fimages%3Fp%3Dbarley%2B6-row%26ei%3DUTF-8%26fr%3Dsfp%26b%3D21&w=379&h=485&imgurl=gemini.oscs.montana.edu%2F%7Emlavin%2Fb434%2Fgraphic%2FHordeum3.jpg&rurl=htt
- http://images.search.yahoo.com/search/images/view?back=http%3A%2F%2Fimages.search.yahoo.com%2Fsearch%2Fimages%3Fp%3Dbarley%2B6-row%26ei%3DUTF-8%26fr%3Dsfp%26b%3D21&w=235&h=164&imgurl=www.extension.umn.edu%2Fdistribution%2Fcropsystems%2Fimages%2F7658f71a.jpg&r
Triticale Pictures of Triticale
- http://lamar.colostate.edu/~voagcurr/triticale.htm
- http://en.wikipedia.org/wiki/Triticale
- http://www.worldbank.org/html/cgiar/newsletter/april97/8tritic.html
- http://www1.agric.gov.ab.ca/$department/deptdocs.nsf/all/agdex127
Plant Genetics/CSS430 http://cropandsoil.oregonstate.edu/classes/css430/
Jean-Luc Jannink Research http://www.public.iastate.edu/~jjannink/
- An interesting URL